...
We will describe a simple flexVDI configuration with no user authentication. This configuration is used to provide access to VDI in environments such as libraries and classrooms, where any user can access a terminal, and use it. There is no distinction among users in this configuration. However, since there is no authentication, you must configure the guest environment so that users do not have access to privileged resources (e.g. use guest accounts, put virtual desktops behind a firewall, limit bandwidth usage, etc). In environments like this, user desktops are all the same for a group of users: they are generated by cloning a Guest template. In this way, users can get fresh machines that are deleted and regenerated periodically.
Description of
...
The user who wants to access a flexVDI desktop in this environment:
...
the scenario
In a kiosk scenario, this are the interactions among the components of the flexVDI Platform:
- The user takes a terminal (thin client, PC, or other) and opens flexVDI Client.
- flexVDI Client sends the terminal identifier (hardware device) to flexVDI Manager.
- flexVDI Manager associates this identifier with an unauthenticated terminal policy. As such, no credentials are requested and the flexVDI Manager just decides which desktop will be presented to the user, according to its configuration. In environments like this, user desktops are all the same for a group of users: they are generated by cloning a Guest template. In this way, users can get fresh machines that are deleted and regenerated periodically.
- flexVDI Client opens a connection to the user's desktop, who can start using it.
- Once the clone desktop is no longer used, flexVDI Manager can delete it to make room for new clones desktops for the next users.
Configuration
...
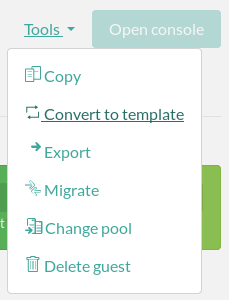
A template is just a Guest taken as the basis for creating clones. Templates cannot be started directly. To turn a regular Guest into a template with flexVDI Dashboard right-click on select the Guest, and select click on the "convertConvert to template" option .in the "Tools" dropdown:
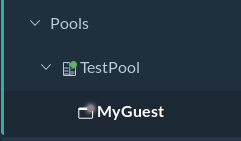
The Guest must be stopped to be transformed. Now, convert the Guest you created in previous steps , (which needs having to have an installed OS to do something useful). Notice that the icon near "myGuest" has changed. It was a Guest icon before conversion:
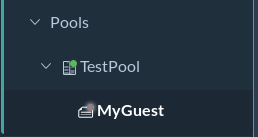
From that moment on, the Guest cannot be started directly, and can only be cloned.
Creating a Desktop Policy
A Desktop Policy describes the life cycle and properties of the desktops that are assigned when users connect to the platform with flexVDI Client. In this example we will configure things like the source template from which desktops are cloned, and where their disk images will be stored. For more details on Desktop Policies, see the VDI section in our Administration Guide.
To create a Desktop Policy, open the VDI section in flexVDI Dashboard
...
and navigate to "Desktop Policies"
...
. Then press the "New
...
Desktop Policy"
...
Enter the name of the policy that we will create: "freeAccessRoomDesktop". The rest of the fields provide additional functionality that is explained in the Administration Guide, there is no need to fill in them now. Click "Next".
Select "mypool", which will be the Pool where Guests of this Desktop Policy will run on, and click "Next".
Select the template that will be used as a basis to create desktops for our users. In our example we select "myGuest" which we converted into a template in the steps shown above. Click "Next".
Select the Volume on which the virtual disk images of the clones are stored. For our example we select "myVolume" in "myImageStorage". Click "Next".
button. This will open a New Desktop Policy form:

Give the new Desktop Policy a name, select your Guest Template in the dropdown list and the Pool from which resources will be taken when a new desktop is started. Select also the Image Storage and Volume you created earlier, to store desktop images there, and leave other parameters with their default value. Then change to the Inactivity Management tab:
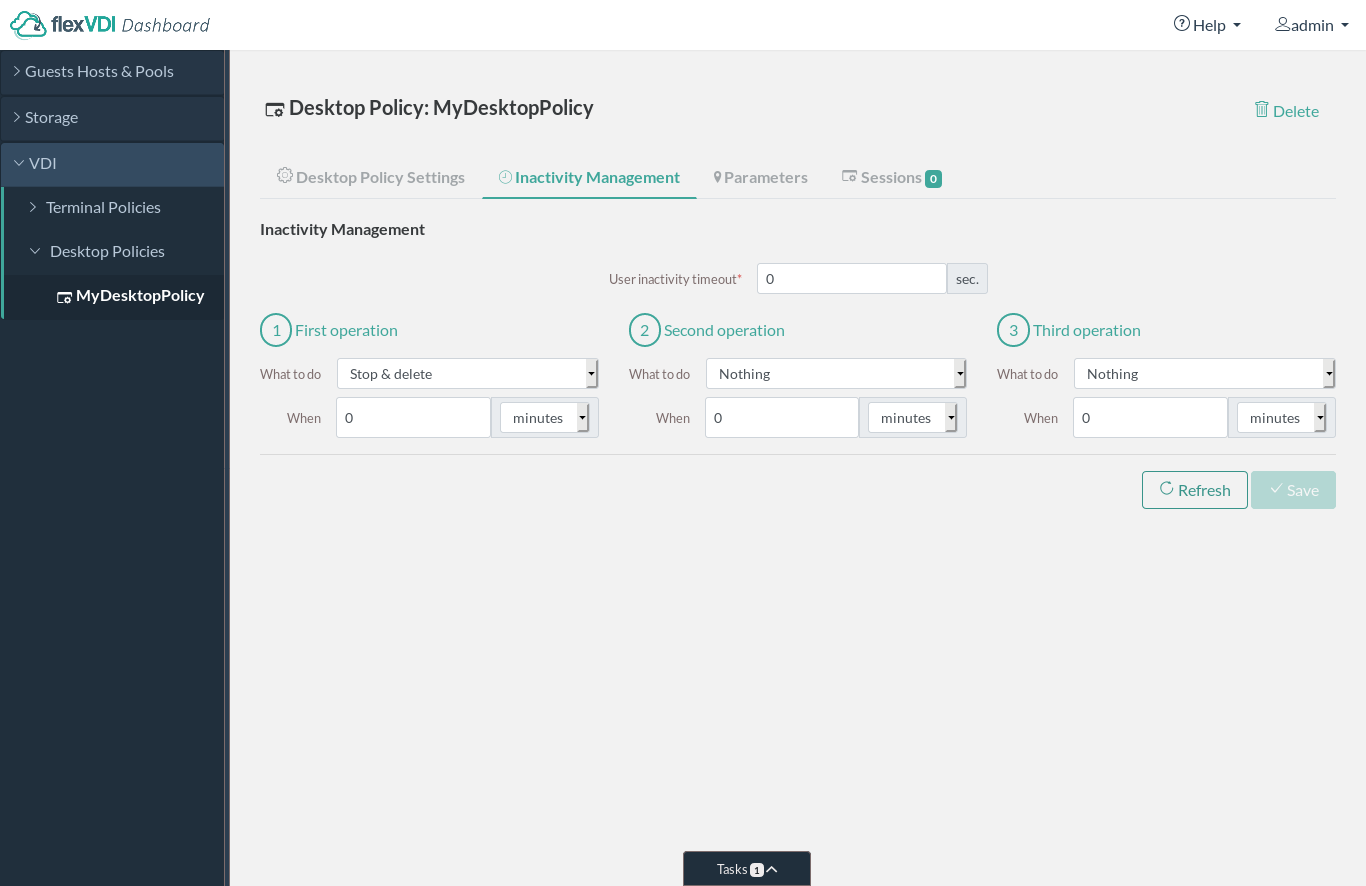
In this screen we will define the life cycle of our desktops. We will give them a life time of 10 hours after the user disconnects Being a kiosk desktop policy for public use, we will destroy desktops just as users disconnect from them. After that, flexVDI Manager will destroy the desktop, and it will create a new one when it is requested. You can learn more about other available options in the Administration Guide. Click Finish.In flexVDI Dashboard we can now see our new Desktop Policydesktop when the next user connects. To get this behavior, select "Stop & delete" after "0 minutes" in the 1st Operation field, as shown in the screenshot. Then click "Save".
Terminal Policy configuration
...
- Whether a user name and password is needed or not (authenticated or kiosk mode).
- The AD/LDAP server configuration to authenticate users.
- The list of default desktop policies that the terminals and/or users will be able to access.
- If authentication is needed, the terminal policy contains the AD/LDAP server configuration. Then, user profiles in the directory contain which desktop policies each user can access.
In our example, instead of creating a new terminal policy, we will modify the "default" policy that already exists.
To do this, click on the "default" terminal policy with the right mouse button, and then "modify". The following window is displayed:
In this screen enter:
- Authentication: "No authentication"
Click "Next".
In this window you can enter a comma separated list of the desktop policies that will be offered to users on connection. In our example we will introduce only one, which is Any terminal that connects to the platform for the first time will be automatically registered to this policy, unless you register it manually to another policy. Select it from the tree view, you will see the following information in the details view:
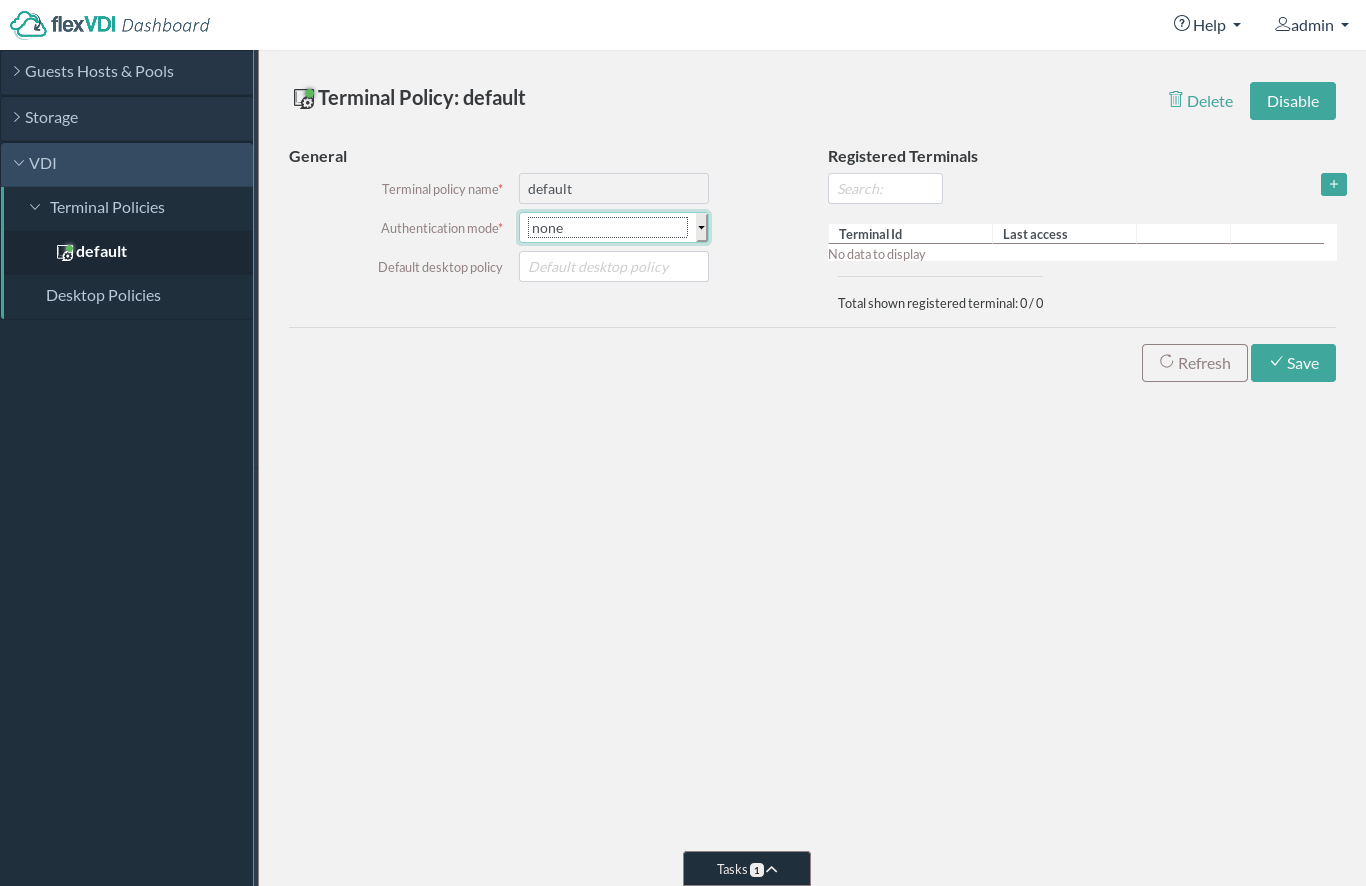
By default, the "default" Terminal Policy is already not authenticated, as the "Authentication mode" is "none". In that case, the flexVDI Manager will assign desktops from the Desktop Policy that appears in the "Default desktop policy" field. Write the name of the Desktop Policy we created before: freeAccessRoomDesktop. Click Finish. you just created, and press the "Save" button. You have completed configuring a basic VDI environment.
Accessing the desktops with flexVDI Client
Now we will show the steps to use the VDI environment you just created. You need a flexVDI Client, that you can download from the downoads Downloads section of https://flexvdi.com. The images of flexVDI Client displayed in this guide are captured on a Windows system, but you can use your favorite platform. Install the one your prefercorrespond to the flexVDI Desktop Client.
Client Configuration
Once installation is complete, go to the Start menu and in the flexVDI Client Program Group click on Config. flexVDI Client will open and show a window like the following:
. When you open it for the first time, it will suggest connecting to the flexVDI Demo Platform. Since you already have a working platform, answer "No" and you will be taken to the Settings page:
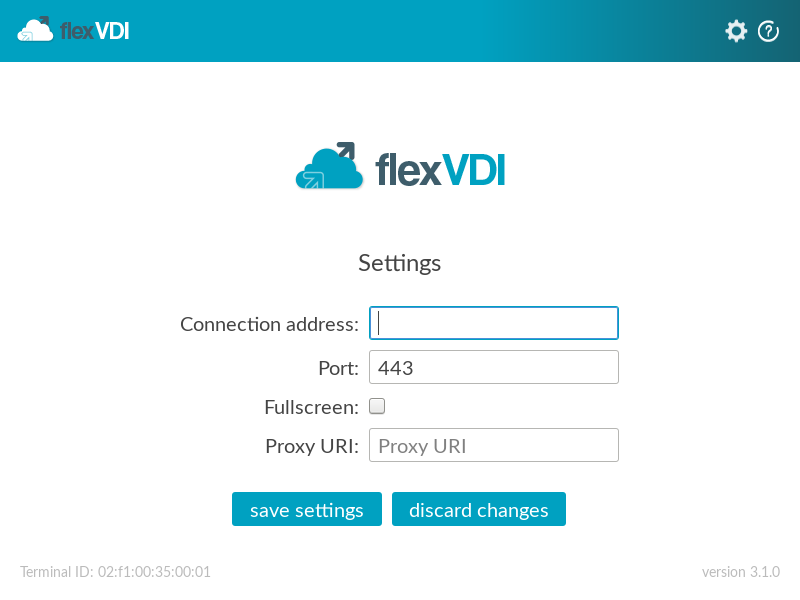
In the box next to the label "ServerConnection address" enter the IP of the flexVDI Manager you configured during the server installation. Alternatively you can enter the name of the manager if you have set up a DNS service.
Note that a string the "Terminal ID" string that appears in the lower left corner of the window next to the text "ID". This is the identifier of the terminal from which the connection is made, and is used by the flexVDI Manager to refer to this particular terminal and distinguish it from others. In the screenshot shown above, it is "5C02:F9f1:DD00:5A35:FA00:6001". We Note it down, we will refer to it later.
Click the button "save changessettings" button. After saving, flexVDI Client will connect to flexVDI manager. According to the policies that we have configured:
- It will decide that the the applicable Terminal Policy applicable is the "default" policy, because we have not set up another policy for terminal "5C02:F9f1:DD00:5A35:FA00:6001" with flexVDI Dashboard.
- It will decide that the desktop policy "freeAccessRoomDesktop" Desktop Policy you assigned earlier is to be applied to "default". If we had more than one Desktop Policy associated to our Terminal Policy, the client would offer a list of options. Proceed .
- It will proceed to create a clone of the "myGuest" template, and send to flexVDI Client the data needed to establish a connection with it.
Finally flexVDI Client will open a connection with the new clonedesktop, and you will have control of the new desktopit will present it on screen.
Assigning a terminal to a Terminal Policy
In our installation, we used the "default" Terminal Policy that is the one used for terminals that have not been explicitly registered in another Terminal Policy. If after connecting with flexVDI Client you select the "default" Terminal Policy in flexVDI Dashboard, you can see the terminal ID of the device which you used to connect in a table in the right areadetails view, and the time of the last access from that device.:
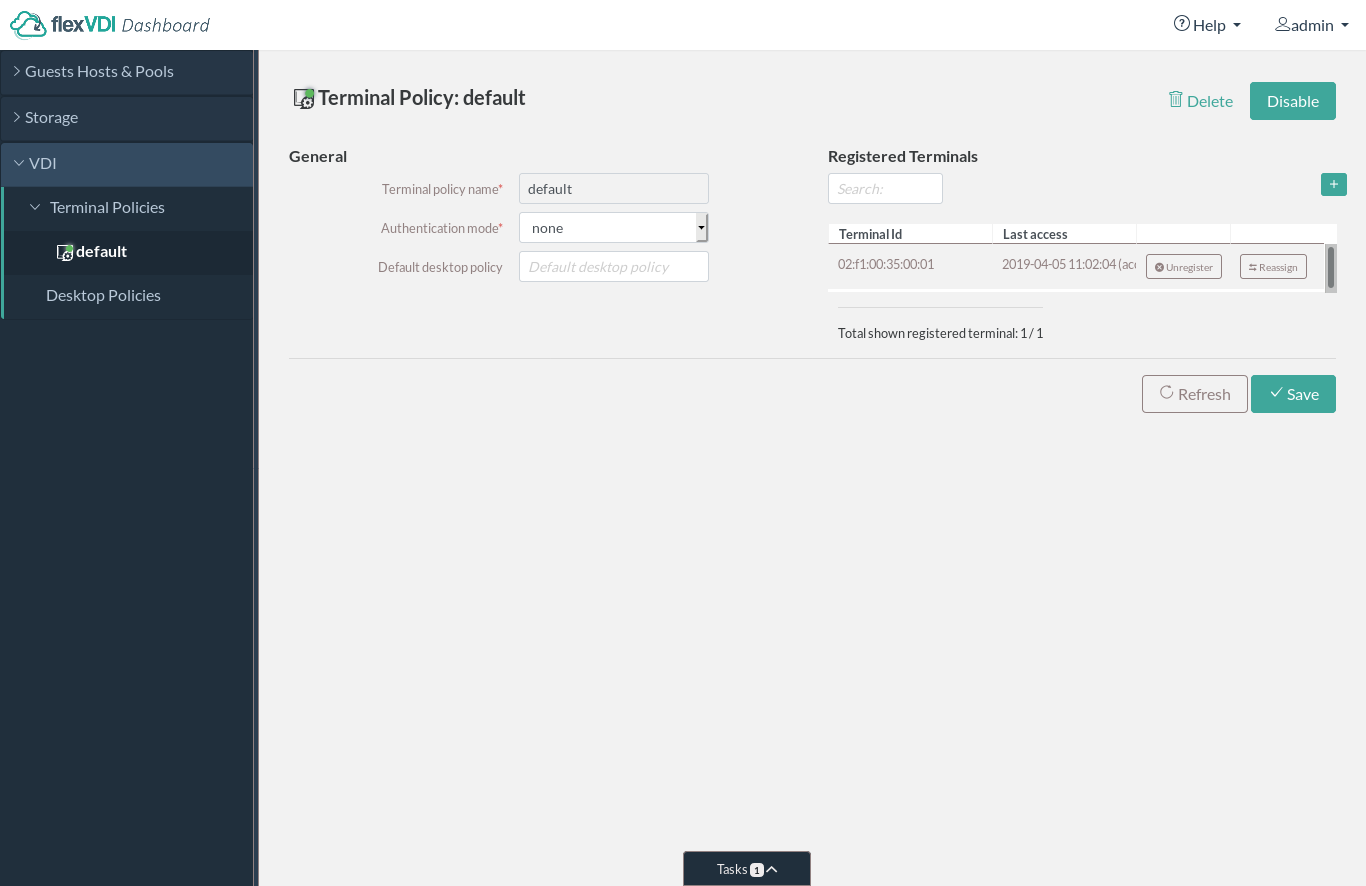
From this screen it is easy to assign the terminal to another Terminal Policy. Use the reassign command of the context menu.
...
"Reassign" button in the "Registered Terminals" table, next to your terminal.
Desktop Sessions
Following the steps in this guide, a clone of Guest MyGuest was automatically created when the connection from flexVDI Client was established. It is possible to see the VDI sessions that have been created by selecting the Desktop Policy in flexVDI Dashboard and switching to the "Sessions" tab. These Guest Guests that are automatically created and destroyed after a while are called volatile Guests. Volatile Guests:
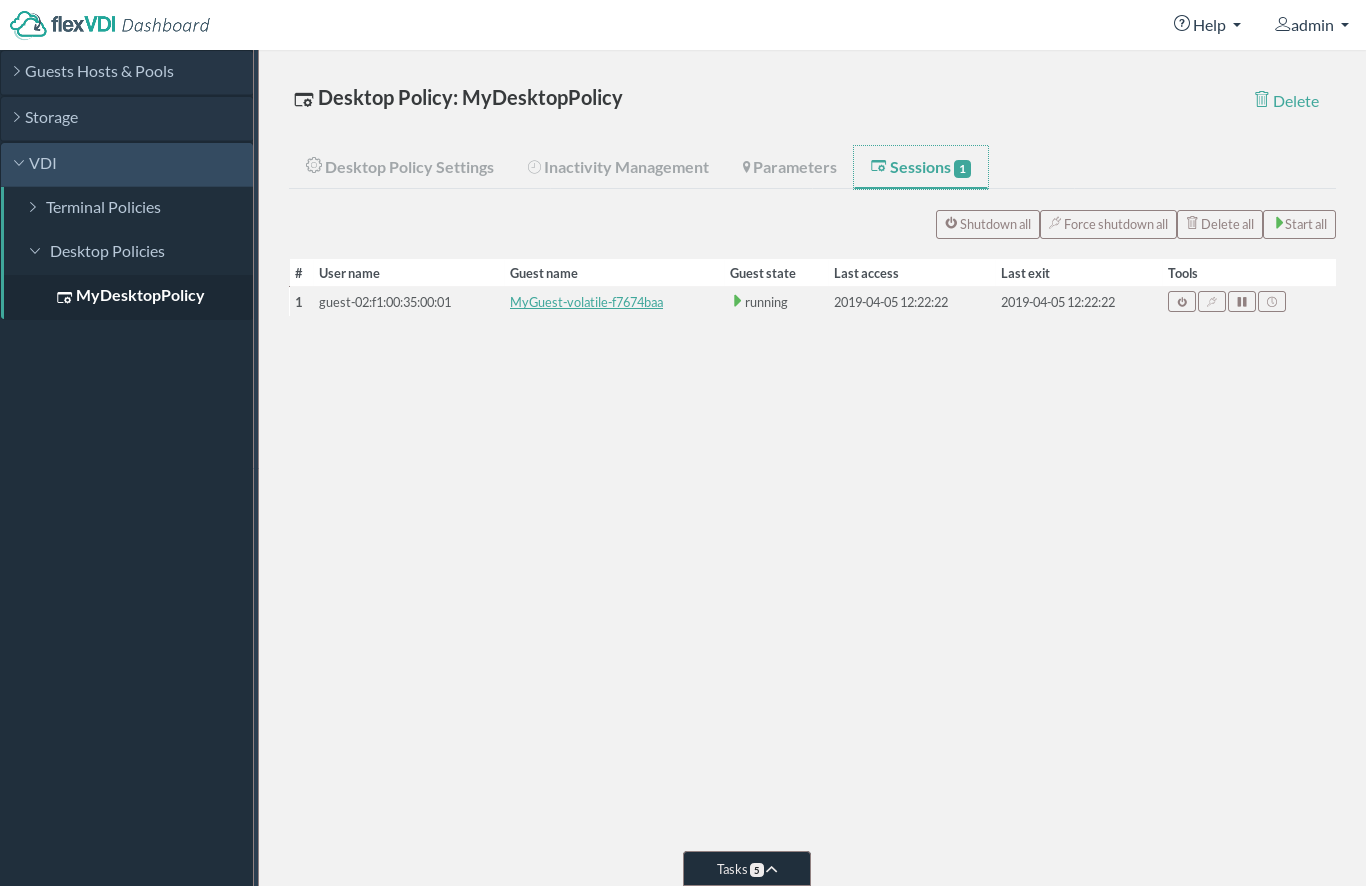
From this list of VDI sessions we you can operate on the corresponding virtual machines, for example stopping them, turning them off, or connecting . For instance, use the tool buttons to stop them, or click on the Guest's name to navigate to its details window and connect to its console.