VDI connections and the flexVDI Gateway
This section explains how to configure your platform so that flexVDI clients are able to connect and present a virtual desktop. Several configurations are possible, from simple ones where clients are able to reach any host of the platform, to more complex ones where hosts are not directly accessible (e.g. they are behind a firewall or NAT router). Here, you will understand these possibilities and their implications, and how to select the configuration that best fits your corporate network.
Simple configuration
This is the protocol that flexVDI clients and the Manager follow to establish a VDI connection:
- The client contacts the manager, identifies itself as a terminal and, optionally, authenticates the user.
- The manager decides which desktop to assign to the user, and returns the connection parameters to the client; in particular, the address of the host where the desktop is running and the Spice port.
- The client connects to the desktop at the supplied host with the Spice protocol.
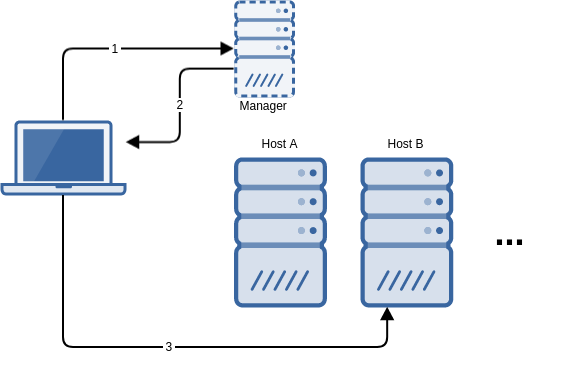
As a result of this conversation, the client must be able to contact the manager as well as every potential host where the desktop may be running. This basic configuration may be suitable when clients are connecting from an internal network.
You can use the Hosts' VDI address to provide an alternative address for clients to connect to, to protect the Hosts and the Manager behind a firewall. However this configuration still requires the clients to be able to reach the Manager, and this is a security risk. So, the VDI address option has been deprecated in favor of flexVDI Gateway, and will be removed in future releases.
Meet the flexVDI Gateway
The previous scenario has several drawbacks:
- The manager and the hosts must be exposed to the clients, so that they can contact them.
- The connection is not encrypted.
- The connection to the manager is performed on TCP port 443, but the connection to the desktop with the Spice protocol is performed on any TCP port starting at 5900 (up to a configurable limit), which is different for each desktop. So, firewall rules become complex.
The flexVDI Gateway is a software component that overcomes this limitations by encapsulating all the traffic, either to the manager or the desktop, with WebSockets over TLS encryption at port 443:
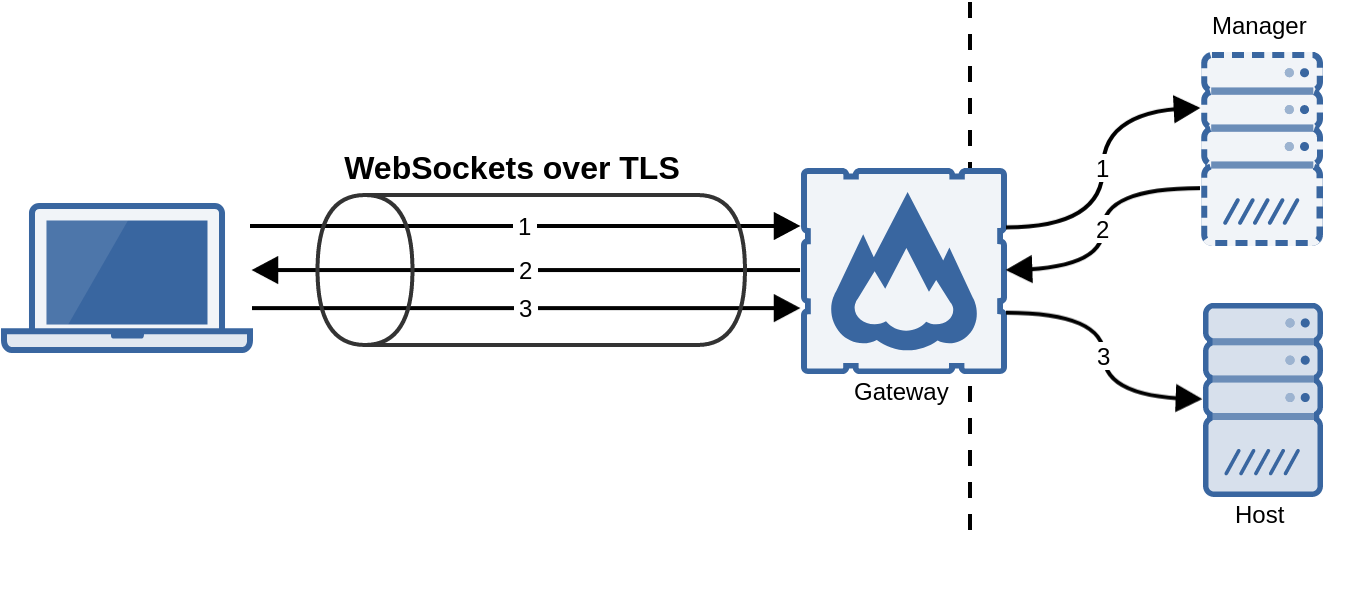
In this way, only TCP port 443 (or the port you configure) of the machine that runs the gateway must be exposed to the clients.
Installation and configuration
The flexVDI Gateway is available as an RPM package for CentOS 7 and RHEL 7, and can be installed from the flexVDI 3.1 Repository. In fact, it is automatically installed and enabled by default on every flexVDI host. It is also part of the WebPortal virtual appliance, so you can import it into your flexVDI platform and use it as the single entry point for all your clients.
Its configuration file, /etc/flexvdi/flexvdi-gateway.conf, must contain a valid JSON object. These are the most common configuration properties (and their default values):
{
    "ManagerIP": "",
    "SslPort": 443,
    "FirstSpicePort": 5900,
    "LastSpicePort": 25900,
    "CertFile": "/etc/ssl/certs/flexvdi-agent",
    "KeyFile": "/etc/ssl/certs/flexvdi-agent",
    "KeepAlive": 0,
    "Debug": false
}
- ManagerIP: It must contain the IP address or name of the manager.
- SslPort: The port where the gateway listens for connections from clients.
- FirstSpicePort: The start port of the range of valid desktop ports. The gateway will refuse to make a connection to a host's TCP port that is not in this range.
- LastSpicePort: The end port of the range.
- CertFile: SSL certificate to identify the gateway in the TLS connection, in PEM format.
- KeyFile: SSL key of the SSL certificate. It can be the same file as the certificate, containing both.
- KeepAlive: Send a WebSocket Ping message every this number of seconds to keep the connection up. This will prevent other network elements (like web proxies, firewalls, etc.) from closing idle connections. The default is zero, which means no Ping message is sent.
- Debug: Show additional debug information in syslog.
Usually, you should only need to set the manager's address. Other default values are just right most of the time. You should not need to modify the range of valid Spice ports, as they match with the default range of ports the manager generates when a new desktop is created. Also, the flexvdi-gateway will use an auto-generated, self-signed certificate by default. Once you modify the configuration file, restart the service with:
# systemctl restart flexvdi-gateway
Other options are:
- ListenIP: IP address to bind the service to.
- PlainPort: Listen for connection with plain HTTP on this port.
- PongTimeout: Number of seconds with no response to a Ping to asume that a connection is lost. Defaults to 10.
Balanced connections
It is possible to use a web load balancer to distribute the client connections among several flexVDI Gateway instances. However, in order for this scenario to work, sequential connections of the same client must be assigned to the same gateway. This can be done, for instance, assigning the gateway by source address.
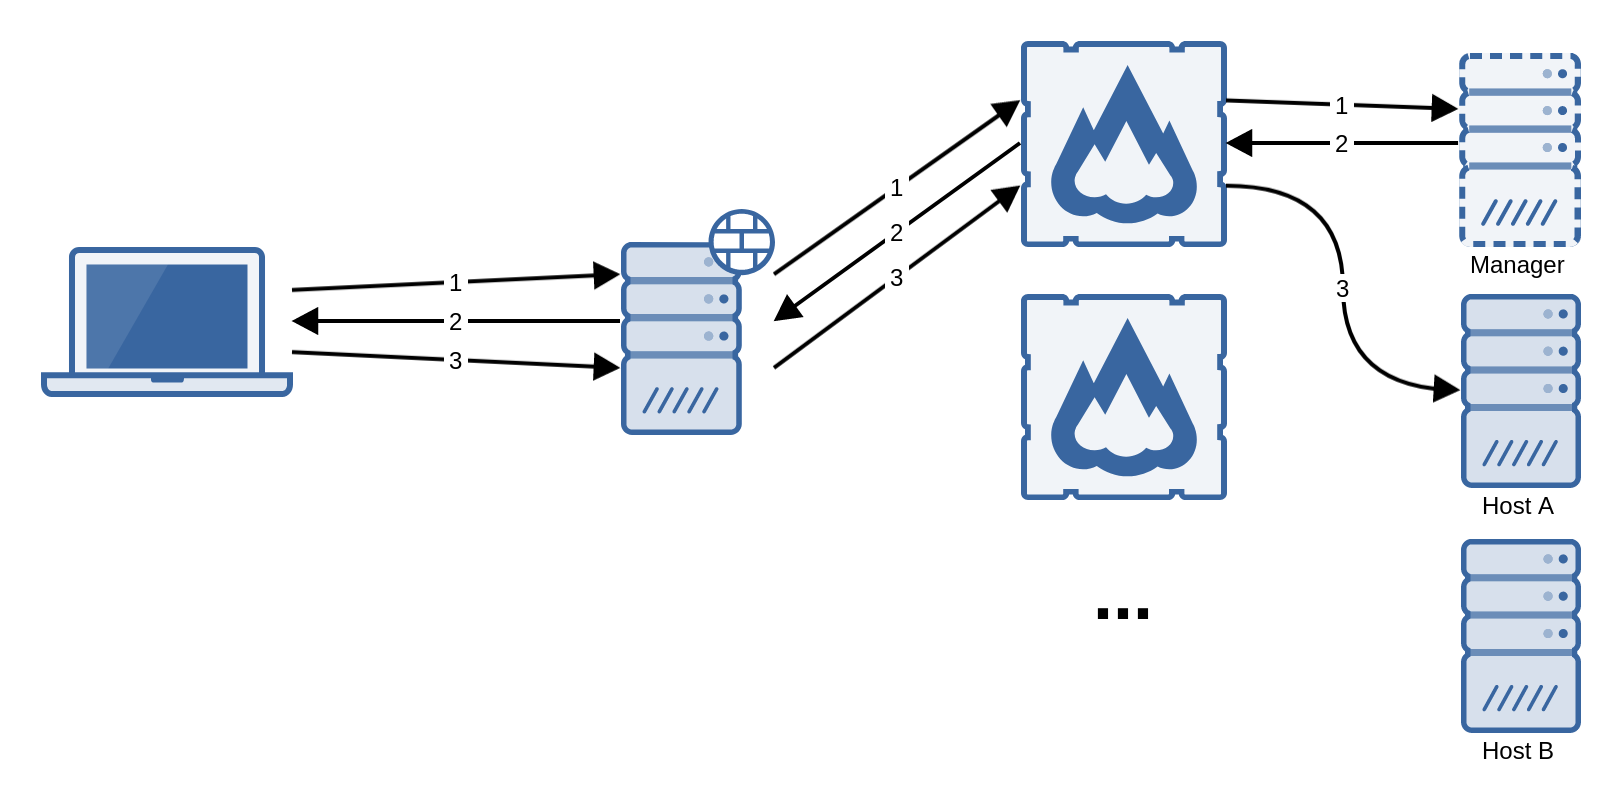
Connecting through a reverse HTTPS proxy
Since the connection between the clients and the gateway are tunneled through HTTPS with WebSockets, they can be managed by a reverse HTTPS proxy. However, the proxy must be configured to open a WebSocket connection with the Gateway. For instance, an Nginx reverse proxy should be configured with the following rule:
location = / {
  proxy_pass http://your_gateway;
  proxy_http_version 1.1;
  proxy_set_header Upgrade $http_upgrade;
  proxy_set_header Connection "upgrade";
}
For Apache, you need at least Apache 2.4 and the mod_proxy_wstunnel module.
Giving a single entry point to several flexVDI platforms
Some large sites have several flexVDI managers orchestrating several flexVDI installations.
A flexvdi-gateway can act as a single entrypoint for several flexVDI managers, provisioning the flexVDI manager IP for each end user in his ldap entry.
To achieve this, also populate the following entries in etc/flexvdi/flexvdi-gateway.conf
{
   ...
  "LDAPServer": "",
  "LDAPPort": 389,
  "LDAPUsername": "",
  "LDAPPassword": "",
  "LDAPBaseDN": "",
  "LDAPSearchRDN": "",
  "LDAPAttribute": "",
  "LDAPOneShot": true,
  "LDAPFallback": true,
  "LDAPCacheSecs": 3600
}
- LdapServer: It must contain the IP address or name of the ldap server.
- LDAPPort: Port lisening to ldap requests.
- LDAPUsername: Bind user to request to the ldap. It must have read access to the pertinent branch of the ldap server
- LDAPPassword: Passowrd used to athenticate to LDAPUsername.
- LDAPBaseDN: Branch of ldap to search for the user.
- LDAPSearchRDN: ldap attribute used as username for searching the end user
- LDAPAttribute: The attribute in the ldap user entry that stores the flexVDI manager IP or host name assigned to this user.
- LDAPOneShot: Search for the user only immediately under LDAPBaseDN
- LDAPFallback: If ldap search for theLDAPAttribute gives no result, for instance because it is empty, or deos not exist for the user, fallback to the "ManagerIP" value in the flexvdi-gateway.conf as default
- LDAPCacheSecs: Number of seconds to cache the ldap data in the flexvdi-gateway, to reduce ldap server load.