Overview
Starting with version 3.1, the flexVDI USB Live Client is now renamed as flexVDI ThinClient OS.
The flexVDI ThinClient OS is a Linux distribution, that boots from either a hard drive or a USB pendrive, so it does not depend on another operating system. Its purpose is to turn old computers and Thin Clients into flexVDI virtual desktop terminals, since it supports a wide range of harware with 32 and 64-bit Intel achitectures. Its main features are:
- Distribution based on Porteus 4.0, with Linux kernel 5.0.
- It works with BIOS and UEFI (NOTE: Secure Boot is NOT supported and must be disabled).
- Installable on hard disks and MMC devices.
- Up-to-date graphics drivers, for Intel, AMD and Nvidia cards.
- Possibility of acting as PXE server and boot other flexVDI ThinClients in the same network.
- Customizable design and configuration.
- It fits into just 1GB.
Preparation
The flexVDI ThinClient OS image that is available in the download section of the flexVDI web is ready to be written to a pendrive. Once downloaded, the write process will depend on the operating system you are working on. We show here two possibilities.
GNU/Linux
On this OS, the preferred and simplest method to write an image to a USB pendrive involves using the dd command. You must be root to run this command on a device file. There are GUI tools too, that simplify this process, like Gnome Multi-Writer, Etcher and Unetbootin.
But first you must identify the device file for your pendrive. Insert the pendrive in an available USB port. If your system notifies you of the new USB device, do not open it; the pendrive must not be mounted in order to be written. Open a terminal window and write the following command:
# lsblk -p
This command will show a list with the drives connected to the computer, their partitions and their size. Identify the device file that represents your pendrive with this information. Make sure that the field "MOUNTPOINT" has no value.
Once the device file has been identified (we will assume it is /dev/sdb from now on), write the following commands:
# zcat flexvdi-thinclient-os-3.1.0.img.gz | dd of=/dev/sdb bs=1M
# sync
When it finishes, you will have a bootable pendrive with flexVDI ThinClient OS.
Windows
In Windows, the most famous tool to write images in USB pendrives is Rufus. Just make sure you check the "Create a bootable disk using: DD Image". Then, simply select the image file you downloaded and the USB pendrive, and press "Start". There is no problem in using a GZip-compressed image, Rufus will uncompress it on the fly.
Booting
Insert the pendrive in the computer where you want to run flexVDI Client, and turn it on. If your computer is not configured to boot from USB, you must change the configuration, or select the USB pendrive from the boot device menu. This process depends on the firmware that is installed in your computer. flexVDI ThinClient OS works with both BIOS and UEFI firmwares.
A boot menu with the flexVDI logo will appear:
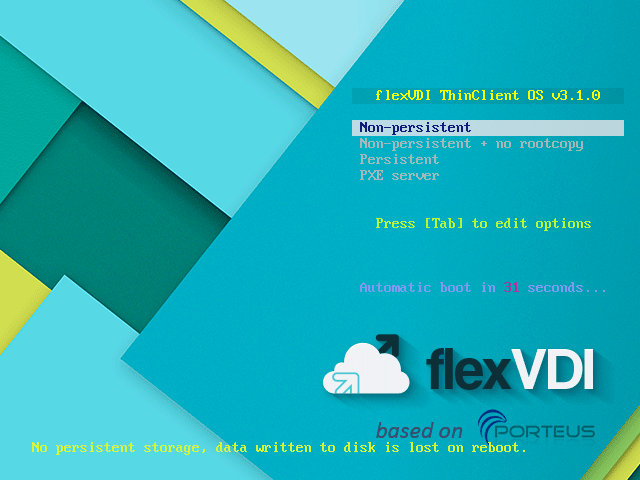
It contains four entries:
- Non-persistent. In this mode, any change made to the filesystem is lost when the ThinClient is shut down. This is the most common mode for ThinClients and kiosk devices. A special directory in the main Porteus partition, named
rootcopy, lets system administrators add custom configuration files to the base system. - Non-persistent + no rootcopy. This mode is like the first one, but customizations in the
rootcopydirectory are not applied. This mode is intended for system administrators, to test the system while they prepare the customizations. - Persistent. In this mode, changes are saved to a directory in the main Porteus partition, named
changes. This mode is useful if you are using flexVDI ThinClient OS to perform tasks other than running the flexVDI Client. - PXE server. In this mode, this instance of flexVDI ThinClient OS is able to boot other computers through the network. Use it to quickly deploy your customizations to a wide set of ThinClients.
If nothing is selected, the system will boot in non-persistent mode after 60 seconds. After a short boot process, the client window will show:

Figura 1: Client interface after the first boot-up.
Usage
The flexVDI ThinClient OS boots by default into a minimalistic desktop with the flexVDI Desktop Client automatically loaded. The look and functionalities of the flexVDI Desktop Client won't be detailed here again.
At the top border of the desktop, there is a panel with information and additional actions. From left to right:
- An application menu, with some tools and settings.
- A button to open a terminal window.
- The list of open windows.
- The keyboard layout applet. It lets you cycle through the available keyboard layouts.
- The network connection applet. It shows the current status and allows to connect to wired and WiFi networks.
- If present, the battery status.
- The clock with the date and time.
- The audio volume applet. Decrease volume with left-click, increase with right-click and open audio mixer with middle-click.
Audio mixer
The audio mixer is ncpamixer, a text-only version of pavucontrol. This mixer is keyboard-controlled only, so read through its documentation to learn about the default key bindings. Besides setting the audio volume, ncpamixer will let you control which audio devices are used as a source and sink for the flexVDI Desktop Client. You can select the default device for all audio applications, or change it just for the flexVDI Desktop Client. For instance, to set the default audio sink (output):
- Press F3 to navigate to "Output Devices".
- Use up and down arrows to select the desired device.
- Press d to set it as the default audio sink.
Installation
To install the client in the computer so that the USB pendrive is not needed anymore, use the installation program. To launch it, you must log in as root by either:
- Opening a terminal window and running '
su -'; the default password is 'flexvdi'. - Or change to a text terminal with Ctrl+Alt+F1 and log in as root.
Then, run the installation script /root/install.sh. It expects the destination device file as argument. By default, it will try to install in /dev/mmcblk0 (if it exists) or in /dev/sda. Once the destination device is confirmed, the installation process will start.
The installation script will set up the boot mode (BIOS or UEFI) to the same one that was used to boot from USB. Beware that we have observed some UEFI systems that will not boot correctly once the installation process is finished. If you encounter this problem and your system is able to boot from BIOS too (usually referred to as "Legacy mode" in the UEFI configuration), try to repeat the installation process in this mode.
If you try to install the client on a disk that contains a previous version, the installation program will ask you if you want to keep the old custom configuration. Beware that only the contents of the rootcopy subdirectory are kept, not the changes subdirectory.
After a successful installation, remove the USB pendrive and restart your computer.
Customization
Since it is based on Porteus v4.0, the customization process of the flexVDI ThinClient OS is similar. The root filesystem is mounted in memory and a set of base modules are loaded. In non-persistent mode, changes done to the filesystem once it is booted are not saved to disk, and they are lost when the system is shut down. To customize the system and persist these changes, they have to be written to a special directory in the data partition named rootcopy.
The distribution is divided in two partitions. The first one contains the boot files, the second one contains the base modules and the customization files, inside a directory named porteus. During the boot process, after loading the content of the base modules in the root filesystem, the files from the rootcopy subdirectory are copied. Any change that has to be applied on every reboot must be copied to this subdirectory. Any file in this directory is copied to the root filesystem, keeping its full path, owner and permissions, so the customization possibilities are endless. The command persist will copy any file or directory to the rootcopy directory with the correct path, ownership and permisions; just run it as persist [file|dir].
Another way of customizing the system is to boot in Persistent mode and copy the changes subdirectory to the rootcopy subdirectory. This is appropriate if you plan to make a lot of changes, and copying them one by one would be tedious. However, there may be changes that happen as a side effect of your actions (history files, logs, etc), so you may need to review all the changes and remove those that are not needed.
Here we show some common customization examples, assuming that the data partition is /dev/sda2 (this and any other found partition are automatically mounted at /mnt on boot).
Customize the boot menu
You may want to remove some of the boot options, reduce the time before booting the default entry or change the background image. The boot menu is implemented with Syslinux. Consult its documentation to learn how to make these kind of changes.
Syslinux configuration file resides in /mnt/sda1/boot/syslinux.cfg, both for BIOS and UEFI firmwares.
Customize the connection address
The flexVDI platform address where the client must connect to is stored in the client configuration file /home/guest/.config/flexvdi-client/settings.ini. By default, there is no configured address, and the client will ask you to connect to flexVDI's Demo Platform after every reboot. So, in order to set a custom address (or any other flexVDI Desktop Client option), it must be stored in the file /mnt/sda2/porteus/rootcopy/home/guest/.config/flexvdi-client/settings.ini. Changes to this file are persistent, and will take effect after the machine is rebooted:
[General]
host=flexvdi.your-company.com
...
Select the sound devices by default
When there are many sound devices connected to the computer (sound cards with several inputs or outputs, HDMI ports, USB microphones, etc...), you must set which ones will be shared with the remote desktop. You can do this with the audio mixer, but in order to keep changes after reboot, you have to persist the directory /home/guest/.config/pulse.
Configure the network
The network configuration is performed with the panel applet, next to the clock. Press the icon with the left mouse button and a menu with the available connections will show. Press it with the right mouse button and you will be able to modify them or add new ones. In any case, the configuration is stored in the directory /etc/NetworkManager/system-connections. So, to persist this configuration, just run persist /etc/NetworkManager/system-connections.
Configure the language
The system language is set to Spanish by default. You can set your preferred locale and keyboard layout, but take into account that the flexVDI client is only translated to English.
The language is set with the LANG environment variable in the file /etc/profile.d/lang.sh. Just modify it and run persist /etc/profile.d/lang.sh so that your changes persist after reboot. For instance, to select US English, change the default value of es_ES.utf8 to en_US.utf8.
You can also change the keyboard layout and timezone. These are set in the file /mnt/sda2/porteus/flexvdi-porteus-4.0.cfg with the following parameters:
- kmap=layout1,layout2,... Sets the keyboard layout or layouts, to Spanish and American English by default. See the
/etc/X11/xkb/symbolsdirectory for valid keyboard layouts. - timezone=region/zone. Sets the timezone, to Europe/Madrid by default. See the file
/usr/sbin/timeconfigfor valid time zones.
You DO NOT have to persist the flexvdi-porteus-4.0.cfg
Select which USB devices to redirect at connect time
In order to have one or more USB devices (e.g. a smartcard reader) always redirected, you have to follow these steps:
- Identify the vendor and product ID (VID & PID) of these devices. You can easily do this if you open the USB device selection menu, from the client's toolbar:
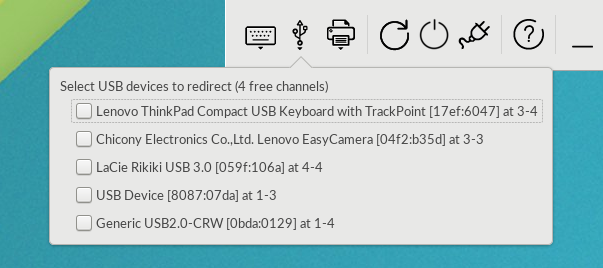
The VID and PID are the two hexadecimal numbers that appear enclosed in square brackets after the name of each device. Modify the file
/mnt/sda2/porteus/rootcopy/home/guest/., like with the connection address, the following way:config/flexvdi-client/settings.ini[Devices] usbredir-redirect-on-connect=-1,VID1,PID1,-1,1|-1,VID2,PID2,-1,1|...
Where VID1, PID1, ... are the VID and PID of each device you want to redirect on connect. Each tuple "-1,VID,PID,-1,1" is separated from the rest with a vertical bar "|". VID and PID numbers must be written in hexadecimal, with a leading "0x" prefix. For instance, to redirect the first device (it is a Bluetooth dongle) on connect, I would write the tuple "-1,0xa12,0x1,-1,1". See the documentation about USB redirection in the flexVDI Desktop Client.
Booting many thin clients with PXE
It is very easy to set up a PXE server with flexVDI ThinClient OS, and deploy it to a group of network-bootable thin clients. This deployment strategy has the following advantages:
- Install once on the server, deploy as many thin clients as you want.
- Configuration and customizations are centralized, and automatically deployed to the thin clients when they reboot.
- Supports both non-persistent and persistent thin clients. Changes are stored in the server over NFS.
- DHCP, DNS and routing can be provided by the PXE server or by external services.
Take into account that the architecture of the thin clients and the server must match (i.e. i686 or x86_64), you cannot boot 32-bit clients with a 64-bit server.
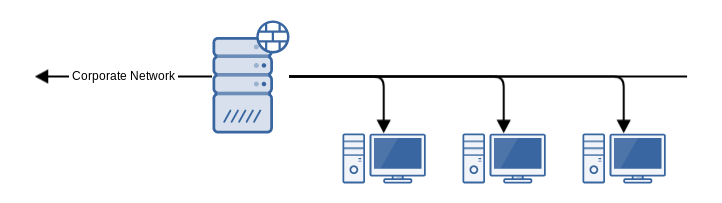
Example
Here, we are going to present an example with all the features, where the PXE/TFTP server will also provide DHCP, DNS, NAT routing and NFS. All these components are optional and can be provided with external services. In this example, our server has two physical interfaces, that are connected to a corporate network and a private network, respectively. Thin clients are connected to the private network, and the server will act as a router with NAT so that the thin clients can connect with the outside:
Setup
Follow these instructions:
- Install flexVDI ThinClient OS on one computer, which will act as the PXE and DHCP server.
- Set the default boot entry to "PXE Server" and reboot. This entry also enables persistence, so all the changes you make from now on will be saved on disk.
- During the boot process, there will be a message complaining about
/etc/pxe-server.confnot existing, ignore it for now. - The "PXE Server" entry disables the graphical session. Log in as root in the console.
You will have to configure a static IP address for the server on each subnet it is connected to. Use the nmcli tool. In our example, we configure the following IP addresses:
# nmcli con show
NAME                UUID                                  TYPE            DEVICE
Wired connection 1  21c5dc0e-2304-3f96-b2f4-08a431284e9f  802-3-ethernet  eth0
Wired connection 2  b3ff3172-a87f-34aa-bbc5-654e3b2b4a26  802-3-ethernet  eth1

## First interface in corporate network, with gateway and DNS server
# nmcli con mod "Wired connection 1" connection.autoconnect true ipv4.method manual ipv4.addresses 192.168.1.10/24 ipv4.gateway 192.168.1.254 ipv4.dns 8.8.8.8

## Second interface in private network. Our example DHCP server will provide addresses in this subnet and we will use NAT to route traffic to the outside
# nmcli con mod "Wired connection 2" connection.autoconnect true ipv4.method manual ipv4.addresses 10.0.0.1/24
Since we want to provide routing with NAT, we also enable it with an iptables rule: TODO
Copy the
/etc/pxe-server.conf.sample file to/etc/pxe-server.confand edit it. It contains the following environment variables that define how PXE clients configure their network:# IP range and netmask for PXE clients # e.g. 10.0.0.50,10.0.0.250 PXE_RANGE= PXE_NETMASK= # Gateway and DNS server. Optional, default to this host. PXE_GATEWAY= PXE_DNS= # dnsmasq extra options DNSMASQ_EXTRA=""
- PXE_RANGE: Defines the DHCP IP address range to use for PXE clients. If no range is defined, the DHCP server is disabled and you will need to configure an external DHCP client to supply the correct PXE options. Check the
/usr/bin/pxe-serverscript to see what options are needed and their correct values. - PXE_NETMASK: Netmask of the DHCP range.
- PXE_GATEWAY: IP address of the network gateway. If it is not set, PXE clients will use this server also as gateway. In that case, IP forwarding is automatically enabled, but you will have to configure everything else to route traffic through this server (e.g. NAT and/or routes).
- PXE_DNS: IP address of the DNS server. If it is not set, PXE clients will use this server also as DNS server.
- DNSMASQ_EXTRA: Additional options to pass to dnsmasq (the DHCP/TFTP/DNS server). This is useful if you want to provide the clients with additional information in the DHCP response (e.g. NTP server).
- PXE_RANGE: Defines the DHCP IP address range to use for PXE clients. If no range is defined, the DHCP server is disabled and you will need to configure an external DHCP client to supply the correct PXE options. Check the
Fill in the correct values for your network. For our example, we set the following values:
PXE_RANGE=10.0.0.10,10.0.0.240
PXE_NETMASK=255.255.255.0
Run the pxe-server command to start the PXE server now (or reboot). You should see an output like this:
Preparing PXE environment - wait a while...
PXE services should be started now
Then the following directories and files should have been created:
/srv/pxe/boot. Contains the pxelinux files to boot the PXE clients, for both BIOS and UEFI./srv/pxe/porteus. It is bind-mounted to/mnt/sda2/porteus, so that the PXE clients can load the OS files. Besides, the directory/srv/pxe/porteus/rootcopy.pxeis created, where you can persist the configuration files for the PXE clients independently from the configuration of the server./srv/pxe/storage. It is bind-mounted to/mnt/sda2/porteus/changes.pxe, where changes of clients are persisted over NFS if they boot in persistent mode.
Your PXE server is now prepared to serve the flexVDI ThinClient OS.