VDI: flexVDI in kiosk mode
We will describe a simple flexVDI configuration with no user authentication. This configuration is used to provide access to VDI in environments such as libraries and classrooms, where any user can access a terminal, and use it. There is no distinction between users in a group.
Description of system operation by end users
The user who wants to access a flexVDI desktop in this environment:
- Takes a terminal (thin client, PC, or any other) and opens flexVDI Client if it is not already open.
- flexVDI Client sends the terminal identifier (hardware device) to flexVDI Manager.
- flexVDI Manager decides which is the desktop that will be presented to the user, according to its configuration. In environments as the present example, user desktops are all the same for a group of users: they are generated by cloning a Guest template. This way users can get fresh machines that are deleted and regenerated automatically periodically.
- flexVDI Client opens a connection to the user's desktop, who can start using it.
- Once the clone is no longer used, flexVDI can delete it to make room for new clones for the next uses.
Configuration
Preparing a template
A template is just a Guest taken as the basis for creating clones. Templates can not be started directly.
To turn a regular Guest into a template with flexVDI Dashboard right-click on the Guest, and select the "convert" option. The Guest must be stopped to be transformed. Now, convert the Guest you created in previous steps, which needs having an installed OS to do something useful. Notice that the icon near "myGuest" has changed. It was a Guest icon before conversion:
And now it has a template icon:
From that moment, the Guest can not be started directly, and can be cloned.
Creating a Desktop Policy
To create a Desktop Policy, open the VDI section in flexVDI Dashboard. In the context menu "Desktop Policies" and press "New desktop policy ".
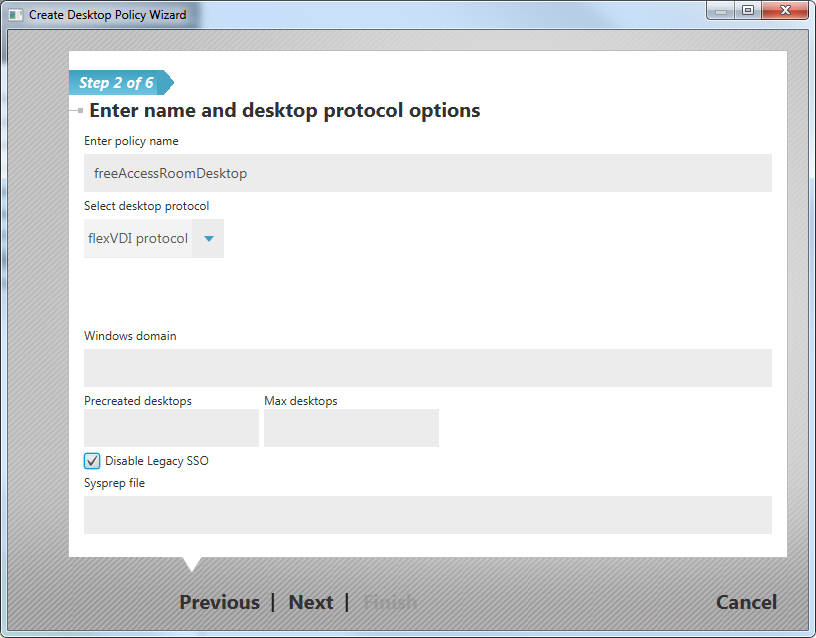
Enter the name of the policy that we will create: "freeAccessRoomDesktop". Select "flexVDI Protocol" as the Desktop Protocol and check "Disable old SSO" because it is not needed in new installations. There is no need to fill in the other fields. Click "Next".
Select "mypool", which will be the Pool where Guests of this Desktop Policy will run on, and click "Next".
Select the template that will be used as a basis to create desktops for our users. In our example we select "myGuest" which we converted into a template in the steps shown above. Click "Next".
Select the Volume on which the virtual disk images of the clones are stored. For our example we select "myVolume" in "myImageStorage". Click "Next".
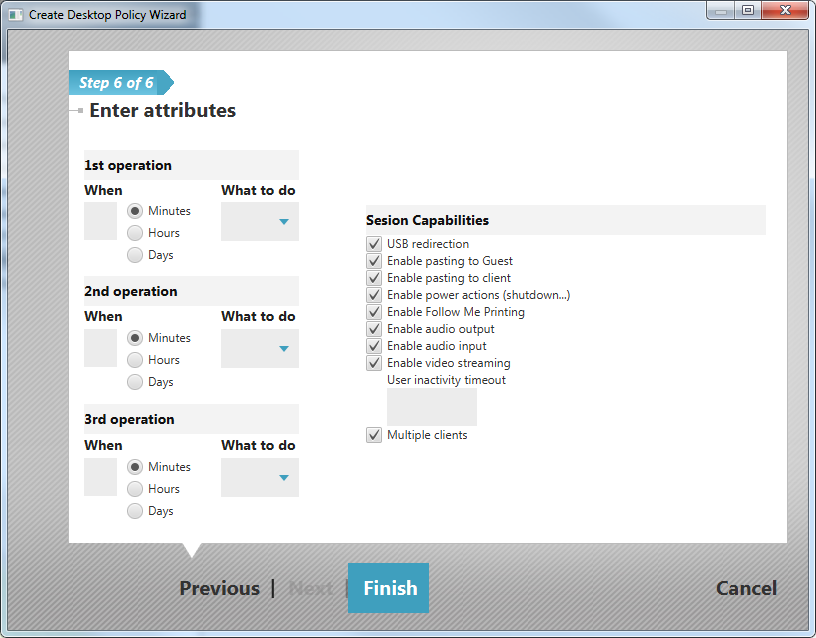
In this screen we will define the life cycle of our desktops. We will give them a life time of 10 hours after the user disconnects from them. After that flexVDI will destroy the desktop, and it will create a new one when it is requested. You can learn more about other options available in Session capabilities of a Desktop Policy. Click Finish.
In flexVDI Dashboard we can now see our new Desktop Policy.
Terminal Policy configuration
A terminal policy is a set of rules associated to one or more terminals. Determines whether from a given terminal:
- You need to enter a user name and password, or not (kiosk mode, unauthenticated).
- In "kiosk" mode, as the present case, it references the desktop policies that the terminals will access. Authenticated policies can have a default desktop policy too.
- If users have to authenticate themselves, the terminal policy contains the AD/LDAP server configuration. This server contains information about the desktop assigned to every user.
In our example, instead of creating a new terminal policy, we will modify the "default" policy that already exists.
To do this, click on the "default" terminal policy with the right mouse button, and then "modify". The following window is displayed:
In this screen enter:
- Authentication: "No authentication"
- Desktop Protocol "Spice Kiosk"
Click "Next".
In this window you can enter a comma separated list of the desktop policies that will be offered to users on connection. In our example we will introduce only one, which is the name of the Desktop Policy we created before: freeAccessRoomDesktop. Click Finish.
You have completed configuring a VDI environment.
Accessing the desktops with flexVDI Client
Now we will show the steps to use the VDI environment you just created. We need a flexVDI Client. You can download one from the dowloads section of http://flexvdi.com
The images of flexVDI Client displayed in this guide are captured on a Windows system, but you can use your favorite platform, although user interface varies. Install your preference.
Client Configuration
Once installation is complete, go to the Start menu and in the flexVDI Client 2.2 Program Group click on Config.
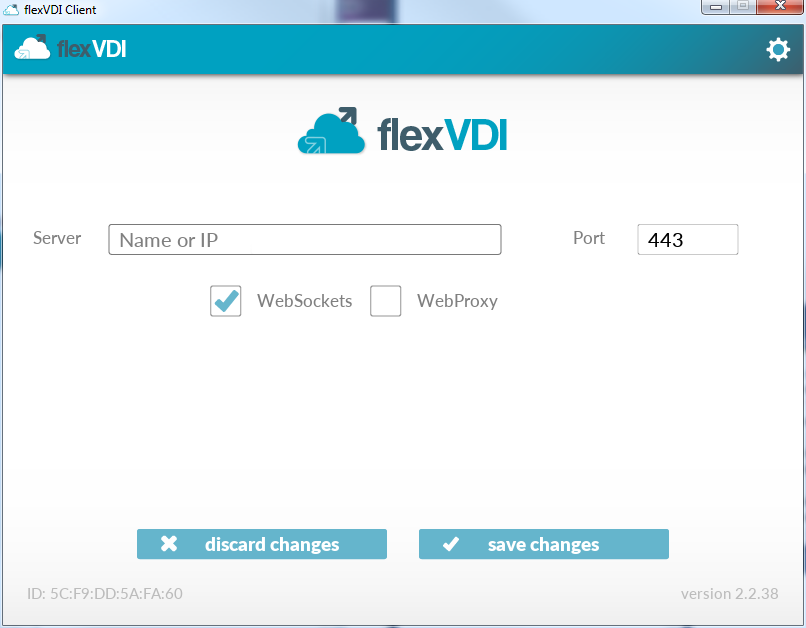
flexVDI Client will open and show a window like the following:
In the box next to the label "Server" enter the IP of the flexVDI Manager you configured during the server installation. Alternatively you can enter the name of the manager if you have set up a DNS service.
Note that a string appears in the lower left corner of the window next to the text "ID". This is the identifier of the terminal from which the connection is made, and is used by the flexVDI Manager to refer to this particular terminal and distinguish it from others. In the screenshot shown above, it is "5C:F9:DD:5A:FA:60". We will refer to it later.
Click the button "save changes".
After saving, flexVDI Client will connect to flexVDI manager. According to the policies that we have configured:
- It will decide that the Terminal Policy applicable is the "default" policy, because we have not set up another for "5C:F9:DD:5A:FA:60" with flexVDI Dashboard.
- It will decide that the desktop policy "freeAccessRoomDesktop" is to be applied to "default". If we had more than one Desktop Policy associated to our Terminal Policy, we would be offered a list of options.
- Proceed to create a clone of the "myGuest" template, and send to flexVDI Client the data needed to establish a connection with it.
Finally flexVDI Client will open a connection with the new clone, and you will have control of the new desktop.
Release mouse and keyboard on flexVDI Client for Windows
It should be remembered now that keyboard and mouse are redirected to the Guest. If the Guest does not have the flexVDI Guest tools installed, or they are still not running during the virtual machine boot process, it is convenient to use some flexVDI Client shortcuts:
- Left shift + F8: to free mouse and keyboard from Guest capture, and get them out of the flexVDI Client window.
- Left shift + F10: to toggle full screen mode.
These shortcuts are also shown when clicking on the "+" button in the top of the flexVDI Client window.
Assigning a terminal to a Terminal Policy
In our installation, we used the "default" Terminal Policy that is the one used for terminals that have not been explicitly registered in another Terminal Policy.
If after connecting with flexVDI Client we select the "default" Terminal Policy in flexVDI Dashboard, you can see the terminal ID of the device which you used to connect in a table in the right area, and the time of the last access from that device.
From this screen it is easy to assign the terminal to another Terminal Policy.
Volatile Guests created.
Following the steps in this guide, a clone of Guest was automatically created when the connection from flexVDI Client was established. It is possible to see the VDI sessions that have been created by selecting the Desktop Policy in flexVDI Dashboard. These Guest that are automatically created and destroyed after a while are called volatile Guests.
From this list of VDI sessions we can operate on the corresponding virtual machines, for example stopping them, turning them off, or connecting to its console.


