flexVDI Desktop Client
- Javier Celaya (Unlicensed)
- Jorge Olmos (Unlicensed)
Overview
Starting with version 3.1, the flexVDI clients for Windows, Linux and Mac OS have been unified into the flexVDI Desktop Client. It is a complete rewrite of the client code, that focuses on portability and uniformity. This client provides a common experience across all the supported platforms, both in terms of visual aspect and features. Besides, its new architecture allows to keep up with the most recent versions of the Spice Client library, with added stability and performance.
Installation
You can download the flexVDI Desktop Client 3.1 from our web page, as usual. Besides, we have made this new rewrite completely open source. You can find the source code in our GitHub repository.
The installation process depends on the platform:
- Windows: The flexVDI Desktop Client for Windows 3.1 can be downloaded as an installer, for both 32 and 64 bit platforms. It supports Windows platforms from Windows 7 to Windows 10. Download the suitable installer for your platform, run it and follow the steps as described on screen.
- Linux: Currently, the Linux version of the flexVDI Desktop Client is available as an AppImage executable, for both 32 and 64 bit platforms. Download the suitable version for your platform, move it to a directory that is in your PATH (~/bin, for instance), give it execution rights and you can start using it right away.
- Mac OS: The Mac OS version of the flexVDI Desktop Client is distributed as a DMG image, in the usual way of other software for this platform. Just open the image and drag the flexVDI icon to your Applications folder.
Getting started
The first time you run the flexVDI Desktop Client, you will see the following window:
The main window of the flexVDI Desktop Client consist of some common elements and a form widget in the main body of the window that changes depending on the situation. The common elements are:
- The top title bar, with the flexVDI logo on the left, and the settings (cog wheel) and about (interrogation mark) buttons on the right. Status and error messages appear just under this bar.
- The main body, with a customizable client logo and the current form widget.
- The footer, with information about the terminal ID of this client and its version.
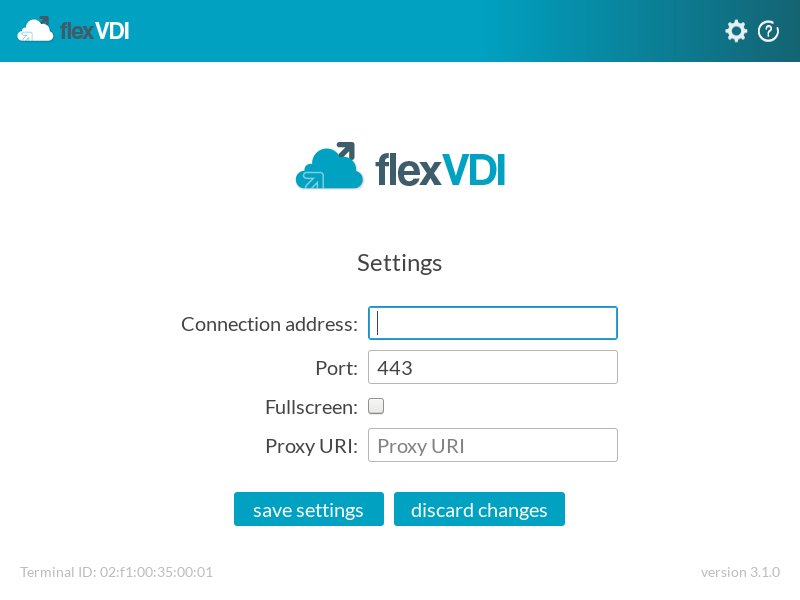
The current form widget will change with the user actions, as it evolves through the authentication process until the desired desktop is selected. When you start the client for the first time, no flexVDI platform is configured yet, so the application takes you directly to the settings form.
Settings
In the settings form, you can set:
- Connection address: The name or IP address of the flexVDI platform.
- Port: The TCP port to connect to. By default it is 443.
- Fullscreen: Whether to switch to fullscreen as soon as the connection to the desktop is made.
- Proxy URI: The URI of a web proxy to use for the connection if no direct communication is available. E.g. https://user:passwd@proxy.mycompany.com
Click on "save settings" once you have configured them, or "discard changes" if you want to revert anything you changed. You can come back to the settings form at any time pushing the cog wheel button on the upper-right corner of the window, or pressing F3 on your keyboard.
If this is your first time trying out flexVDI, we encourage you to test our demo platform: connect to manager.flexvdi.com, port 443, and log in with user flexvdi and any password.
Authentication
When a flexVDI platform address is set, the application navigates to the login form:
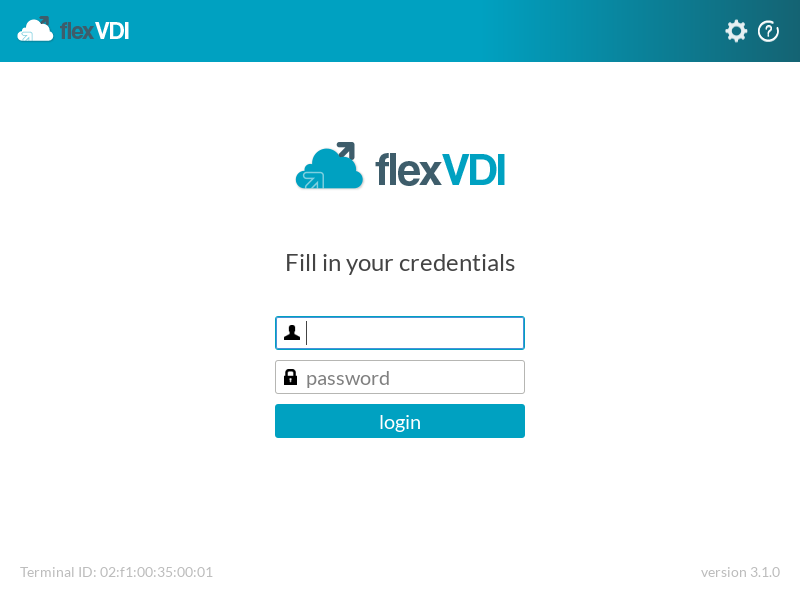
This form shows an input for the username, another for the password and a login button. But before you can write anything, the client will connect with the platform and identify itself using its Terminal ID. If the platform decides that your terminal does not require authentication, the application will skip this step. Otherwise, you can write your credentials and push the login button (or just hit enter).
Desktop selection
Finally, the application navigates to the desktop selection form:
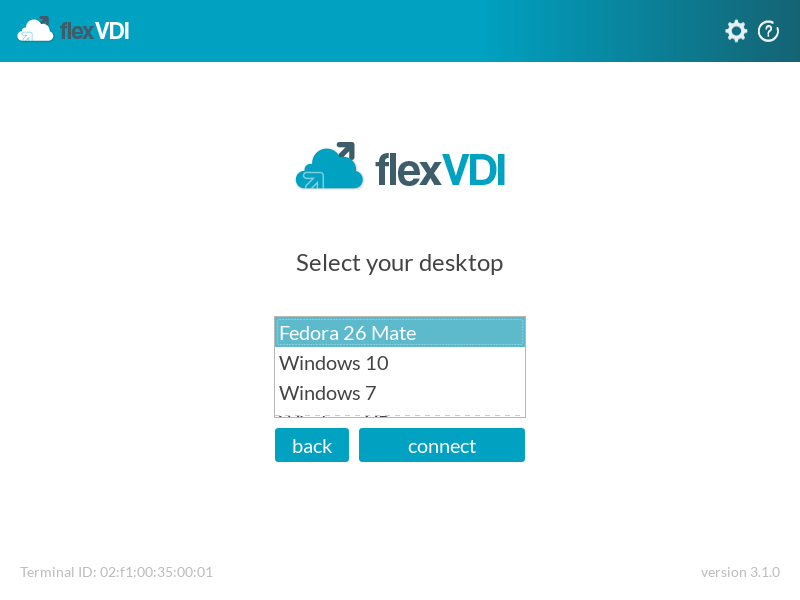
The client presents the list of possible desktops that the platform has offered. You can select one by clicking on it and then pushing the "connect" button, or just double-clicking on it. You can also navigate the list with the up and down arrow keys, or search for a desktop by typing its name. Finally, you can also go back to the login form with the "back" button. If the platform offers just one possible desktop, this step is skipped and the application jumps directly to connect with the desktop.
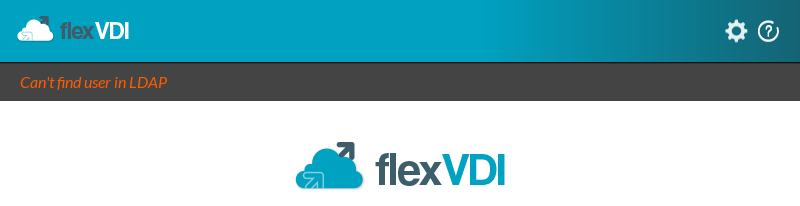
Status and errors
The flexVDI Desktop Client shows some status and error messages just under the main window's title bar. These are some examples:

Desktop presentation
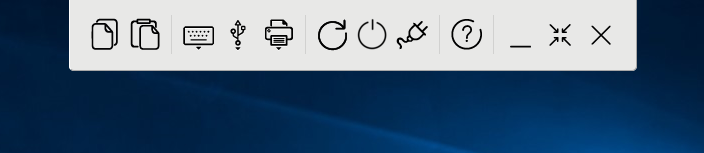
When the client connects to a virtual desktop, the main window disappears and the desktop presentation window is shown. It consists of just a toolbar and the desktop area:
The toolbar contains the following actions:
- Copy from guest: Copies the content of the virtual desktop's clipboard into the client's clipboard.
- Paste to guest: Pastes the content of the client's clipboard into the virtual desktop's clipboard.
- Send key combinations: Shows a dropdown with a list of key combinations to send to the virtual desktop, but that cannot be captured by the client. E.g. Ctrl+Alt+Supr.
- Share USB devices: Shows a dropdown with the list of USB devices currently connected to the client's computer. Each one has checkbox that states whether the device is redirected to the virtual desktop.
- Share printers: Like the previous one, this action shows a dropdown with the list of configured printers in the system, with a checkbox each one to redirect them to the virtual desktop.
- Reset: Sends a reset signal to the virtual desktop, that is abruptly restarted. This action and the following two show a confirmation dialog.
- Orderly shutdown: Sends a shutdown signal to the virtual desktop. The guest operating system can catch it and shut itself down in an orderly fashion, or ignore it. In the former case, the client application will exit.
- Immediate poweroff: Sends a poweroff signal, terminating the virtual desktop at once and exiting the client application.
- About: Shows the about dialog.
- Go fullscreen: Puts the window in fullscreen mode.
When in fullscreen mode, only the desktop area is visible all the time. The toolbar slides down from the screen top edge (bottom edge in Mac OS) when you move the mouse pointer near it:
Besides, the "Go fullscreen" action is replaced with these other actions:
- Minimize: Minimizes the client window.
- Restore view: Exits from the fullscreen mode.
- Close connection: Closes the connection with the virtual desktop and exits the client application.
Some of the buttons in the toolbar are not visible under the following circumstances:
- The copy and paste buttons, USB devices dropdown, printers dropdown and power buttons do not appear when the respective features are disabled by the flexVDI platform for the current desktop.
- The copy and paste buttons are visible only if automatic clipboard sharing is disabled (it is enabled by default).
- The USB devices dropdown does not appear in Mac OS, because USB redirection is not supported in this platform.
Clipboard sharing
FlexVDI Client supports clipboard sharing with virtual desktops when the flexVDI Guest Tools are installed in the guest. Both copying from and pasting into the guest is supported, and can be disabled independently by the platform. By default, clipboard sharing is automatic, so you can just press Ctrl+C in the virtual desktop and Ctrl+V in the physical desktop, and the contents of the clipboard will be transferred automatically. If you do not want this to happen, or it is working erratically (this may happen if you have a clipboard manager installed in either side), automatic clipboard sharing can be disabled with a configuration flag, which are discussed later in this document. In that case, the copy and paste buttons are shown in the toolbar so that you can decide when to share the clipboard.
Clipboard sharing only supports certain basic types of data, like text and images. Copying whole files or directories is not supported, for that operation see the "File drag'n'drop" and "Shared folder" features later in this document.
Sending keystrokes
When the desktop presentation window is the active window, most keystrokes are sent to the virtual desktop. In particular, the Alt, Ctrl and Windows keys are inhibited in the client desktop so that the user has a better immersive experience in the virtual desktop. So combinations like Alt+Tab, Alt+F4, and other shortcuts are passed to the virtual desktop, and do not make the flexVDI Desktop Client lose the focus in the client desktop.
However, some key combinations cannot be captured. They are not sent to the virtual desktop and take effect in the client computer. These special key combinations are different in each platform. For instance, Ctrl+Alt+Supr cannot be captured in all platforms, Ctrl+Alt+F1 to F12 cannot be captured in Linux and Ctrl+L cannot be captured in Windows. These key combinations are provided in the "Send key combinations" dropdown so that they can be sent to the virtual desktop without affecting the client desktop.
USB device redirection
The flexVDI Desktop Client is capable of redirecting USB devices from the client computer to the virtual desktop, in those platforms where this feature is supported:
- Windows: You have to install an additional driver in the local windows machine: UsbDk. You can download the latest version from here. Besides, you need read and write access rights to USB devices, consult your local administrator.
- Linux: You need read and write permissions on files under /dev/bus/usb. In some distributions, these files are owned by a special group (e.g. plugdev), in others you can do this by adding a udev rule, consult your distribution documentation.
- Mac OS: USB redirection is not currently supported.
To redirect a USB device, click on the "Share USB devices" dropdown in the toolbar and select the proper device:
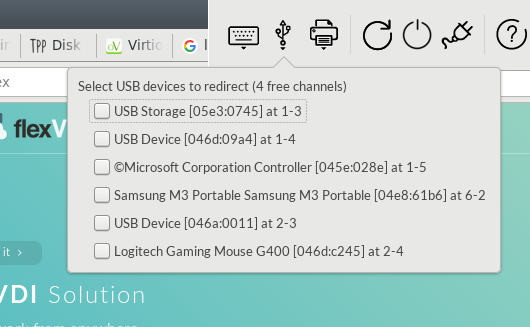
The list shows with a checkbox which devices are already redirected, and how many can be redirected at the same time (in the example, there are 4 free slots). The flexVDI Desktop Client makes its best to identify the devices, but when no descriptive name is available, the Vendor ID and Product ID are provided.
The client can be configured to redirect some devices automatically on startup or on plug-in. More on this in the Advanced configuration section, later.
Follow-me Printing
Printers configured in the client's computer can be redirected to the virtual desktop. For this feature to work, the flexVDI Guest Tools must be installed in the virtual desktop. When a printer is redirected, a "proxy" printer is created in the virtual desktop with the same name as the redirected one. Any document sent to the proxy printer will appear in the real printer. The proxy printer uses a default driver with the most common features (color/b&w, duplex printing, paper quality, etc), but any vendor-specific features will not be available. If you need any of these features, you can send your documents to the special printer "flexVDI PDF Printer". These documents will be rendered to a PDF file and opened in your client computer with your default PDF viewer. From there, you can print the document with the vendor-specific driver.

The flexVDI Desktop Client remembers which printers you had redirected when you last closed it. These printers are redirected again when you reconnect to your virtual desktop.
Grabbing and ungrabbing the mouse pointer
Mouse pointer integration is not possible when the Spice guest tools are not installed in the virtual desktop, or the guest agent is not running (during the virtual desktop boot process, for instance). In that case, the mouse pointer must be grabbed by the client in order to control the mouse pointer of the virtual desktop. You can do this by simply clicking on the desktop area. The mouse pointer is then used exclusively by the flexVDI Desktop Client, and it must be ungrabbed in order to use it with other applications. This is done with a special key combination, which is Left Ctrl+F9 by default. More on this in the Advanced configuration section, later.
File drag'n'drop
When connecting to a Linux guest, you can drag files and drop them on the client's window area. As a result, the file is transferred to the Downloads folder of the guest's desktop, and that folder is shown with the default file browser.
When connecting to a Windows guest, the files dropped on the client's window area are copied to the desktop.
Advanced configuration
Besides the basic configuration that can be set in the settings form, the flexVDI Desktop Client admits several other options through a configuration file. This file has the following default path on each platform:
- Windows: %LOCALAPPDATA%\flexvdi-client\settings.ini
- Linux: $XDG_CONFIG_HOME/flexvdi-client/settings.ini or $HOME/.config/flexvdi-client/settings.ini if $XDG_CONFIG_HOME is not set
- Mac OS: $HOME/.config/flexvdi-client/settings.ini
The configuration file follows the classic INI file format. Four sections are accepted: General, Session, Devices and Layout. Any unknown section or option is silently ignored. Keys are case-sensitive, and they can have a string, integer or boolean value. Boolean values can be either "true" or "false", in lower-case; anything else is an error. Finally, some keys accept lists of values. In that case, they are written as a semicolon-separated list of values.
This is an example of a common configuration file. Unless said otherwise, keys not appearing in the file have a default value of "", 0 or false, respectively.
[General]
terminal-id=c8:60:00:6a:a7:75
host=manager.flexvdi.com

[Session]
fullscreen=true

[Devices]
share-printer=Printer1;Printer2;Printer3
The Layout section is a bit special. It is used to remember the size and position of the desktop presentation window, so that it appears in the same way on the next reconnection.
General options
Options in the General section include connection and auto-login options:
- host: string. Host name or ip address of the flexVDI platform to connect to.
- port: integer, default value is 443. TCP port of the flexVDI platform.
- proxy-uri: string. URI of the connection proxy, or empty if no proxy is used.
- username: string. Name of the user that is used to log in to the flexVDI platform. The flexVDI Desktop Client remembers the last user name used.
- password: string. Password used to log in. If both the user name and password are provided, the client will automatically try to log in.
- desktop: string. Desktop name to connect to. If all of username, password and desktop are provided, the client will automatically try to log in and connect to the desktop.
- terminal-id: string. Identifier of this client as a flexVDI terminal. If this ID is not given, the flexVDI Desktop Client calculates it automatically after the MAC address of the computer and saves it in the configuration file.
- log-level: string, default value is "3". See next section for a description of how logging works.
Logging
The flexVDI Desktop Client writes all log messages to a file in the following path:
- Windows: %LOCALAPPDATA%\flexvdi-client\flexvdi-client.log
- Linux: $XDG_DATA_HOME/flexvdi-client/flexvdi-client.log, or $HOME/.local/share/flexvdi-client/flexvdi-client.log if $XDG_HOME is not set.
- Mac OS: $HOME/.local/share/flexvdi-client/flexvdi-client.log
Logging can be configured with the log-level option, in the General section. The log level is configured with a comma-separated list of "domain:level" values, where "domain" is a logging domain and "level" is an integer number from 0 (log just errors) to 5 (log everything). Most common domains are "flexvdi", "GSpice", "GTK" and "GLib". If domain is not provided, the level is applied to any domain not configured otherwise. The default value is "3", so messages in any domain are logged up to level 3 (warnings and errors). These are some examples of log level configuration:
# Log all debug messages in any domain
log-level=5

# Log debug messages in domain "flexvdi", normal messages in any other
log-level=flexvdi:5,3

# Log debug messages in domain "GSpice", info messages in "flexvdi" and warnings in any other
log-level=GSpice:5,flexvdi:4,2
If you ever need to send the flexVDI Client log files to the support team, always use the following logging configuration:
log-level=flexvdi:5,GSpice:5,3
Session options
Session options are those that apply to a certain desktop connection:
- fullscreen: boolean. Start the desktop connection in fullscreen mode.
- inactivity-timeout: integer. Close the client application after this number of seconds of inactivity. By default (0), no timeout is set.
- flexvdi-disable-printing: boolean. Disable the Follow-me Printing feature.
- auto-clipboard: boolean, default value is true. Automatically share the clipboard between the client and guest desktops.
- auto-usbredir: boolean. Automatically redirect USB devices as they are connected to the client computer.
- grab-mouse: boolean, default value is true. Grab the mouse pointer in server mode (when no Spice Guest Agent is running in the virtual desktop).
- grab-sequence: string, default value is "Shift_L+F12". Key sequence to ungrab the mouse pointer when it is grabbed.
- resize-guest: boolean, default value is true. Resize the virtual desktop resolution to match the client's window size.
- disable-power-actions: boolean. Disable the reset, orderly shutdown and immediate poweroff actions.
- disable-usbredir: boolean. Disable the USB redirection feature.
- preferred-compression: string. Preferred compression algorithm for images. Possible values are auto-glz, auto-lz, quic, glz, lz, lz4 and off. By default, the compression algorithm is selected by the server.
- toolbar-edge: string, default value is "top". Screen edge where the toolbar appears in fullscreen mode. Possible values are "top", "bottom", "left" and "right". In Mac OS, the default value is "bottom" because the application menu appears in the top edge.
- shared-folder: string. Folder in the client's computer that is shared with the Guest, using the WebDAV protocol. See next section to know how to use this feature.
- shared-folder-ro: boolean. Make the shared folder read-only.
Shared folder
You can share a folder of your computer with the guest using the shared-folder option. For this feature to work, you need to configure the guest in the following way:
- Install and start the spice-webdavd service. On Windows, it is included in the flexVDI Guest Tools. On Linux, install the correct package for your distribution. For instance, on Red Hat distributions, install the
spice-webdavdpackage. - Connect with a WebDAV client to
http://localhost:9843. On Windows, a network-connected drive will appear automatically when the spice-webdavd service is started. On Linux, most desktop file browsers will open the locationwebdav://localhost:9843.
Device options
Device options are those that apply to device redirection:
- usbredir-auto-redirect-filter: string. Filter that selects which USB devices to redirect when they are plugged in the client computer. More on USB redirection filters in the next section.
- usbredir-on-connect: string. Filter that selects which USB devices to redirect when the client connects to the desktop.
- flexvdi-serial-port: string list. Serial ports to redirect to the virtual desktop. This feature is only available in Linux. Values are in the form "device,speed,mode", where "device" is the local serial port that is redirected (e.g. /dev/ttyS0), "speed" is the speed in bauds and mode is the parity mode (e.g. 8N1).
- share-printer: string list. List of printers to redirect when the client connects to the virtual desktop. The flexVDI Desktop Client automatically saves the list of printers from the last session.
USB redirection filters
You can configure which USB devices are redirected automatically when the client connects to the virtual desktop and when a new device is plugged in the client computer. This is done with two sets of filters. Each set is a pipe(|)-separated list of filters in the form "class,vendor,product,version,allow", where "class", "vendor", "product" and "version" are device properties and "allow" can be 1 or 0. Device properties are hexadecimal numbers, with the 0x prefix, and a value of -1 means "any" for all of them. Devices that match those properties are filtered in if "allow" is 1, and filtered out if "allow" is 0.
These are some examples of USB redirection filters:
# filter out HID (class 0x03) USB devices and allow anything else
0x03,-1,-1,-1,0|-1,-1,-1,-1,1

# allow only the device with Vendor ID 0x045e and Product ID 0x028e (a Microsoft XBOX USB controller)
-1,0x045e,0x028e,-1,1|-1,-1,-1,-1,0
Options in the command line
You can provide all the previous options in the command line. Options that appear in the command line take precedence over the ones in the configuration file. All of them are passed as --option-name, followed by an argument in the case of string and integer options. For boolean options, --option-name sets the option to true and --no-option-name sets it to false. Most common options also have a short version, with only one leading dash and one letter. Besides, you can provide the following options only in the command line:
- --version: Shows a message with the version number and exits.
- --config-file: string. Alternative path to the configuration file.
- --help, --help-all, --help-X: Shows a help message about feature X.
You can also connect to any virtual desktop using the Spice protocol if you pass a Spice URI as the last parameter of the command line. A Spice URI has the form spice://host?port=XXX&password=YYYY, where XXX is the port where the Spice server is listening for connections, and YYYY is the Spice password for that virtual desktop.
This is the full help message shown with the --help-all option:
Usage:
  flexvdi-client [OPTION...] [Spice URI]

flexVDI Client is a Virtual Desktop client for flexVDI platforms. It can also be used as a generic Spice client providing a Spice URI on the command line.

Help Options:
  -?, --help                                                         Show help options
  --help-all                                                         Show all help options
  --help-gapplication                                                Show GApplication options
  --help-gtk                                                         Show GTK+ Options
  --help-gst                                                         Show GStreamer Options
  --help-device                                                      Show device options
  --help-session                                                     Show session options

GApplication options
  --gapplication-service                                             Enter GApplication service mode (use from D-Bus service files)

GTK+ Options
  --class=CLASS                                                      Program class as used by the window manager
  --name=NAME                                                        Program name as used by the window manager
  --gdk-debug=FLAGS                                                  GDK debugging flags to set
  --gdk-no-debug=FLAGS                                               GDK debugging flags to unset
  --gtk-module=MODULES                                               Load additional GTK+ modules
  --g-fatal-warnings                                                 Make all warnings fatal
  --gtk-debug=FLAGS                                                  GTK+ debugging flags to set
  --gtk-no-debug=FLAGS                                               GTK+ debugging flags to unset

GStreamer Options
  --gst-version                                                      Print the GStreamer version
  --gst-fatal-warnings                                               Make all warnings fatal
  --gst-debug-help                                                   Print available debug categories and exit
  --gst-debug-level=LEVEL                                            Default debug level from 1 (only error) to 9 (anything) or 0 for no output
  --gst-debug=LIST                                                   Comma-separated list of category_name:level pairs to set specific levels for the individual categories. Example: GST_AUTOPLUG:5,GST_ELEMENT_*:3
  --gst-debug-no-color                                               Disable colored debugging output
  --gst-debug-color-mode                                             Changes coloring mode of the debug log. Possible modes: off, on, disable, auto, unix
  --gst-debug-disable                                                Disable debugging
  --gst-plugin-spew                                                  Enable verbose plugin loading diagnostics
  --gst-plugin-path=PATHS                                            Colon-separated paths containing plugins
  --gst-plugin-load=PLUGINS                                          Comma-separated list of plugins to preload in addition to the list stored in environment variable GST_PLUGIN_PATH
  --gst-disable-segtrap                                              Disable trapping of segmentation faults during plugin loading
  --gst-disable-registry-update                                      Disable updating the registry
  --gst-disable-registry-fork                                        Disable spawning a helper process while scanning the registry

Device options
  --usbredir-auto-redirect-filter=<filter-string>                    Filter selecting USB devices to be auto-redirected when plugged in
  --usbredir-redirect-on-connect=<filter-string>                     Filter selecting USB devices to redirect on connect
  --flexvdi-serial-port=<device,speed,mode>                          Add serial port redirection. Can appear multiple times. Example: /dev/ttyS0,9600,8N1
  -P, --share-printer=<printer_name>                                 Share a client's printer with the virtual desktop. Can appear multiple times

Session options
  -f, --fullscreen                                                   Show desktop in fullscreen mode
  --inactivity-timeout=<seconds>                                     Close the client after a certain time of inactivity
  --flexvdi-disable-printing                                         Disable printing support
  --auto-clipboard                                                   Automatically share clipboard between guest and client
  --auto-usbredir                                                    Automatically redirect newly connected USB devices
  --grab-mouse                                                       Grab mouse in server mode
  --grab-sequence                                                    Key sequence to release mouse grab (default Shift_L+F12)
  --resize-guest                                                     Resize guest display to match window size
  --disable-power-actions                                            Disable reset/poweroff guest actions
  --disable-usbredir                                                 Disable USB device redirection
  --preferred-compression=<auto-glz,auto-lz,quic,glz,lz,lz4,off>     Preferred image compression algorithm
  --shared-folder                                                    Shared directory with the guest
  --shared-folder-ro                                                 Shared directory with the guest is readonly
  --toolbar-edge=<top,bottom,left,right>                             Window edge where toolbar is shown (default top)

Application Options:
  -h, --host=<hostname or IP>                                        Connection host address
  -p, --port=<port number>                                           Connection port (default 443)
  --proxy-uri=<uri>                                                  Use this URI to connect through a proxy server (default use system settings)
  -u, --username=<user name>                                         User name
  -w, --password=<password>                                          Password
  -d, --desktop=<desktop name>                                       Desktop name to connect to
  --terminal-id=<terminal ID>                                        Use a given Terminal ID instead of calculating it automatically
  --kiosk                                                            Enable kiosk mode
  -v, --log-level=<[domain:]level,...>                               Log level for each domain, or for all messages if domain is ommited. 0 = ERROR, 5 = DEBUG
  -V, --version                                                      Show version and exit
  -c, --config-file=<file name>                                      Alternative configuration file name
  --display=DISPLAY                                                  X display to use