VDI
- FlexVDI
The third drop-down section of the main tree manages the Virtual Desktop Infrastructure (VDI) of flexVDI. It is configured through two kind of objects: Terminal and Desktop Policies. Terminal Policies apply to the terminal the user is connecting with, and desktop policies apply to the desktops a user is allowed to access. In order to fully understand these concepts, let's see how the flexVDI Manager decides which desktop is shown when a user connects to the platform:
- The user opens a connection with the Manager. The client software identifies itself with a Terminal Identificator (TID). Usually, this TID is shown in the login form of the flexVDI Client.
- The Manager uses the TID to look for a Terminal Policy that contains it, or selects the "default" policy (if it exists; otherwise an error is reported to the client).
- The Terminal Policy determines how to look for the Desktop Policies that can apply to this connection. Two types of Terminal Policy exist of now:
- Unauthenticated (kiosk) policies: It contains a list of one or more Desktop Policies, that is directly returned to the client. Username and password is not needed in this case.
- Authenticated with LDAP: The username and password are required to authenticate the user against an LDAP server. If the authentication succeeds, the user entry is checked to see if it contains a list of Desktop Policies for this user. Otherwise, a default list is returned. If the authentication fails, an error is returned to the user.
- The client receives the list of Desktop Policies and presents them to the user. The user selects one of them, and the client reports it to the Manager. If there is just one Desktop Policy in the list, it is automatically selected upon reception.
- The Desktop Policy determines how to instantiate and connect to a desktop, and the capabilities of the connection. It includes things like the template from which the instance is cloned, what functionalities will be available during the VDI session (clipboard, printers, USB devices, etc) and what happens to the desktop once the user disconnects.
- When a desktop has been instantiated, its connection parameters are returned to the client, and the client connects to the actual desktop.
In this section, we will explain in detail how Terminal and Desktop Policies are configured, and the best practices to manage them in a useful way.
Terminal Policies
A Terminal Policy groups together a set of terminals (flexVDI Client software). When a terminal identifies itself with its TID, the Manager selects a Terminal Policy for it:
- It first looks for a Terminal Policy that already has this TID registered.
- If the TID is not yet registered with any policy, the Manager looks for a Terminal Policy named after the host name that the client used to establish the connection with the Manager. More later on Named Terminal Policies.
- If it cannot find it, the TID is associated with the Terminal Policy named "default".
The Manager then uses the Terminal Policy to get the list of Desktop Policies that will be presented to the user. In an unauthenticated policy, this list is directly stored in the policy. In an authenticated one, the list is retrieved from an LDAP server.
A terminal can be moved from one Terminal Policy to another, or even unregistered. In this way, you can create Terminal Policies for specific groups of terminals, and have a "default" policy for other terminals and the new ones. For instance, there can be a group of public kiosk terminals that require no authentication to connect to a desktop, and the rest of terminals, which must be authenticated.
In the end, the result of applying a Terminal Policy is a list of Desktop Policies, from which the user will pick one. The syntax of this list, in the policy or the LDAP directory, is a comma-separated sequence of items. Each item may be:
- A Guest name. When the user connects to the system with a flexVDI Client he will access the console of this Guest.
- The name of a Desktop Policy; in our example: "freeAccessRoomDesktop". When the user logs in, flexVDI will present him one of the desktops created with the corresponding Desktop Policy.
Each item may be followed by the text that will be presented to the user in the selection box. For instance, an item can be "w7prox64" or "w7prox64=Windows 7 Professional 64-bit". In the first case, the user will see the text "w7prox64", while in the second case the user will see the much more informative text "Windows 7 Professional 64-bit".
Authenticated policies
Authenticated policies contain all the parameters needed to query an LDAP server:
- Hostname and port of the server.
- Bind DN and password. This DN must be able to query for the existence of a user.
- Realm (branch) where the query is based.
- RDN to query for, like cn, uid, samaccountname, etc.
- The desktop attribute: attribute of the LDAP schema that will contain the list of Desktop Policies available to a user.
- A default list of Desktop Policies in case the previous attribute does not exist or is empty.
When the Terminal Policy is authenticated, the client asks the user for a username and a password, and passes them to the Manager. The Manager then authenticates the user against the LDAP server and retrieves the list of Desktop Policies. This list is created by merging the values of the desktop attribute from the following LDAP entries:
- The user entry.
- Since flexVDI Manager v3.0.2: The entries of any group the user is member of, either directly or indirectly. A user is a member of a group G1 if the user entry contains a "memberOf" attribute with value "G1". A user is also member of a group G2 if group G1 is a member of G2.
If neither the user or any of the groups it is member of contain a list of Desktop Policies, the default list is returned.
You can see how to configure an authenticated policy in the First steps guide.
Named policies
In many scenarios, you will want to have different authentication domains; e.g. different LDAP branches for each department in a big company, or even different LDAP servers for each client in a multi-tenancy platform. You need to create a different policy for each domain. However, manually registering terminals to each policy can be an cumbersome task. Named Terminal Policies solve this problem by associating a Terminal Policy with the host name the clients are using to connect with the Manager:
- Create an entry in your DNS servers associating your platform IP address with a different name for each authentication domain. E.g. accounts.mycompany.com and hhrr.mycompany.com.
- Create a Terminal Policy for each of these names, and configure their authentication parameters accordingly.
- Instruct your users to connect to your flexVDI platform using the appropriate name. E.g. users from the accounts department will enter "accounts.mycompany.com" in the hostname field of the flexVDI Client.
Best Practices
Usually, you will want your "default" Terminal Policy to be authenticated and/or use named policies. In this way, your users will be able to move to new, unregistered terminals (like their phone or tablet, or a new computer) and still be able to access the platform without you having to register the new terminals explicitly. Then, you can create additional unauthenticated policies for public kiosk-type terminals. Other common groups of terminals are classrooms, laboratories, office floors, etc.
Use a desktop attribute that already exists in your LDAP directory schema, but is not in use, so that you do not need to modify the schema. If you are using an Active Directory, a suitable attribute would be "info" (or Comment in the AD nomenclature). It can be easily edited with the "AD Users and Computers" tool, where it appears as a big text box labeled "Notes", for both users and groups.
Desktop Policies
A Desktop Policy contains many information that controls how a desktop is instantiated for a user. Most of it was explained when we configured an unauthenticated Terminal Policy in the First steps guide. Here we will go again through the new Desktop Policy wizard explaining the meaning of all the fields. The first page asks for the following information:

- Name of the new Desktop Policy.
- Windows domain. This domain is passed to the virtual desktop along with the username and password so that the SSO plugin can automatically log into a Windows session.
- Precreated desktops. This is the number of cloned desktops that will be created and started in addition to the desktops already in use. When a new user connects to the VDI platform, one of the precreated desktops will be assigned to them, ready to be used, greatly improving the user experience. Then, new desktops wil be precreated in the background to keep up with this number.
- Maximum desktops. This is the maximum number of desktops that can be created with this Desktop Policy. The number of desktops currently in use and the number of precreated desktops cannot be greater than this number. In that case, the number of precreated desktops will decrease.
- Sysprep file. File (relative to /var/lib/flexvdi/local in the hosts) that will be passed to the new desktops to initialise them with the Windows Sysprep utility.
Next, you must select the pool from which resources will be taken. New desktops will consume resources (vCPUs and RAM) from this pool. If not enough resources are present in the pool for new desktops, the VDI session will fail and an error will be returned to the client:

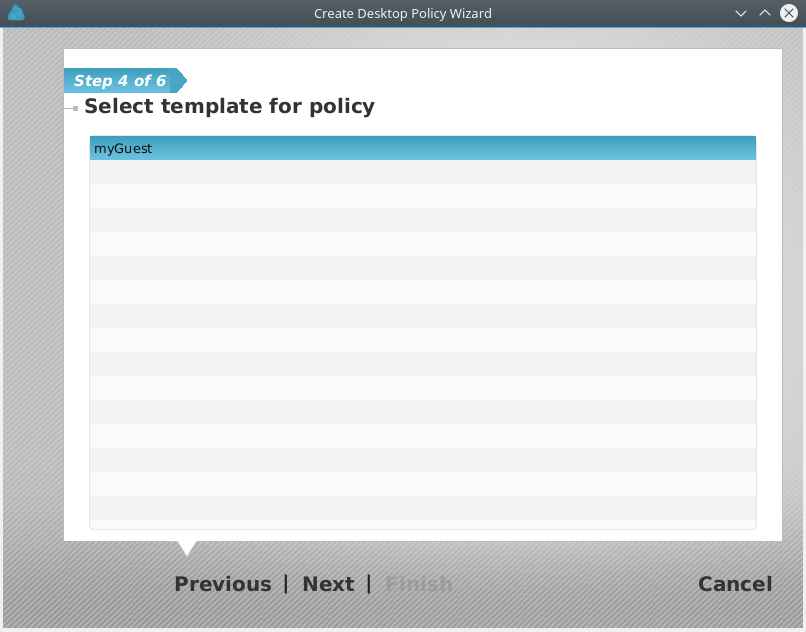
The next page allows you to select the template that will be used to create users' dekstops. Every time a new desktop is needed, a clone of this template will be created:
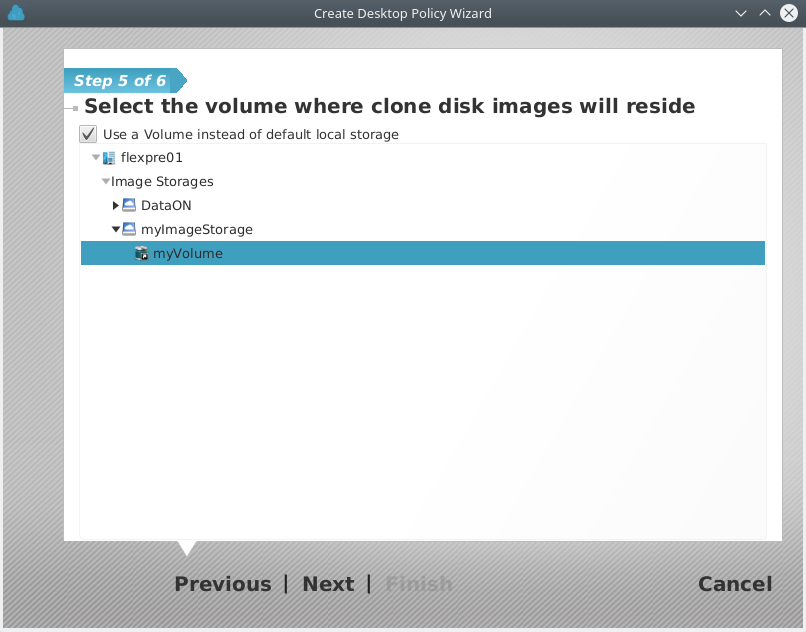
Then, you will have to decide where you want to store the images of the cloned desktops. As explained before, these images only store the differences with the template's ones. For historic reasons, these images where stored in /var/lib/flexvd/volatile, in the host where the cloned desktop is started. In this page you can decide whether to keep using that path or select a different volume. It is a best practice to mount fast (SSD) local storage in that path:
Finally, you can decide what capabilities will be available for the desktops of this Desktop Policy, and what happens when a user finishes a VDI session:
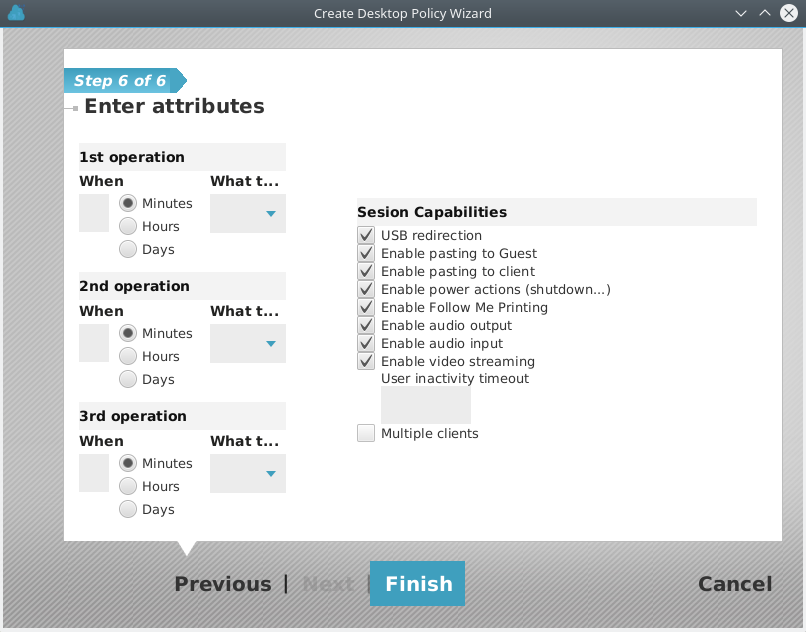
Session capabilities
Session capabilities can be restricted to prevent information leaks, use of restricted resources, etc... The available capabilities are:
- USB Redirection: Allow the redirection of USB devices connected to the local machine through the network connection, so that the Guest sees the device as locally attached.
- Enable pasting to the Guest: Sending clipboard content from local user machine to the Guest.
- Enable pasting to Client: Sending the Guest clipboard contents to the user's local machine.
- Enable Power Actions. Allow the user to send ACPI commands (shutdown, reset, power-off) to the Guest. These options do not affect the shutdown options given by the Guest OS, but the actions that are performed pushing hardware buttons on physical computers, and can be accessed through the flexVDI Client menu.
- Follow me Printing: Allow the creation of virtual printers in the Guest machine that actually print on printers installed on the client's machine.
- Enable audio Output: Enables audio produced in the Guest to be played through the playback device on the local machine.
- Enable audio Input: Enables reception at the Guest of the audio received through the input device (microphone, ....) of the local machine.
- Enable video streaming: enables streaming of areas of the Guest virtual display device detected as video (animations, games, or more generally content that produces large changes on the screen for more than a few seconds, generating a lot of network traffic) to the flexVDI Client. If disabled, when video on the Guest is detected, it will not be sent, showing a black area on the screen of the client and reducing network usage.
- User inactivity timeout: Limits the time (in seconds) that a user session stays open when user does not interact on the desktop (mouse movements or keystrokes). 0 means "no limit".
- Multiple clients: Allows several flexVDI Client programs to share (connect simultaneously to) the same virtual desktop session.
The USB redirection, power actions and the multi-client feature are applied when a new desktop is created, and they will not change during that desktop's lifetime. The other capabilities are applied when a user connects to a desktop and will not change during the session's lifetime. Take that into consideration when you modify the capabilities of a Desktop Policy that currently has running desktops and/or active user sessions.
Besides, the flexVDI Client accepts command line arguments that enable or disable some of these capabilities. In each case, the most restrictive setting applies (like disabling the clipboard or a shorter inactivity timeout).
Lifecicle operations
This page also lets you specify up to three actions that will take place once the user has disconnected from its desktop and the session ends. For each operation you must specify an amount of time and an action. Then, the action will be performed on the desktop that amount of time after the session ends. If the user connects again before the time of an operation elapses, the action is not executed. The possible actions are:
- pause
- suspend
- stop, which will send an ACPI signal so that the guest's OS can orderly halt the machine
- shutdown, which will stop the guest immediately
- destroy, which will stop the guest immediately and remove its state
Pause, suspend, stop and shutdown will leave the desktop in a state that is recoverable. Furthermore, the guest will be started again when its user connects. On the other hand, if a desktop is destroyed it will be shut down and its state removed. When the user connects again, a new desktop will be created for him or her.
These operations are best suited to automatically recycle volatile desktops. For instance, if your users connect everyday from Monday to Friday and you want to recycle the desktops on weekends, you can destroy desktops after 1 day. Or you may destroy desktops after just some hours of being idle. Pausing desktops when the users disconnect is also a good way of not wasting CPU resources, because resuming from paused state is almost instantaneous. Using volatile desktops, with precreated instances and automatic recycling provides a great VDI experience.
Updating a Desktop Policy's template
One of the most common tasks of a flexVDI administrator is to update the template assigned to a Desktop Policy. This can consist in updating the software, installing new programs, applying some patches, etc... In general, any action that modifies a template's disk images. The problem is that a template cannot be directly modified. It must be first converted into a standalone guest, and in order to do so it must have no cloned guests. As a result, a pre-condition to modify the template of a Desktop Policy is to destroy all the desktops cloned from that template. This also means that your desktops must be volatile. More on how to configure your guests so that they are volatile in this page of this guide.
However, in order to avoid destroying the desktops of users that are currently using them while you modify the template, the preferred way of updating a Desktop Policy's template is the following:
- In the Guest / Host / Pool section, locate the template to modify, and make a new copy of it with a different name. A best practice is to append the date to the name of the template, like "Windows7_20171130".
- Convert the copy of the template into a normal Guest, and launch it (with "Run once", so it does not restart after shutdown).
- Open the console of the new Guest, and make any desired changes, as you would normally do on any computer.
- After completing the changes, shutdown the Guest and convert it into a template again.
- In the VDI section, open the context menu of the Desktop Policy, and modify it so that it uses the new template.
From now on, when new desktops are created under this Desktop Policy, they will make use of the new template. The desktops that were already running with the old template will not be affected. Then, you can configure your Desktop Policy so that the desktops are destroyed when the users disconnect, so that the next time they connect an updated desktop will be created for them. Once all the desktops cloned from the original template are destroyed, it can be deleted if desired.