VDI connections and the flexVDI Gateway
- FlexVDI
This section explains how to configure your platform so that flexVDI clients are able to connect and present a virtual desktop. Several configurations are possible, from simple ones where clients are able to reach any host of the platform, to more complex ones where hosts are not directly accessible (e.g. they are behind a firewall or NAT router). Here, you will understand these possibilities and their implications, and how to select the configuration that best fits your corporate network.
Simple configuration
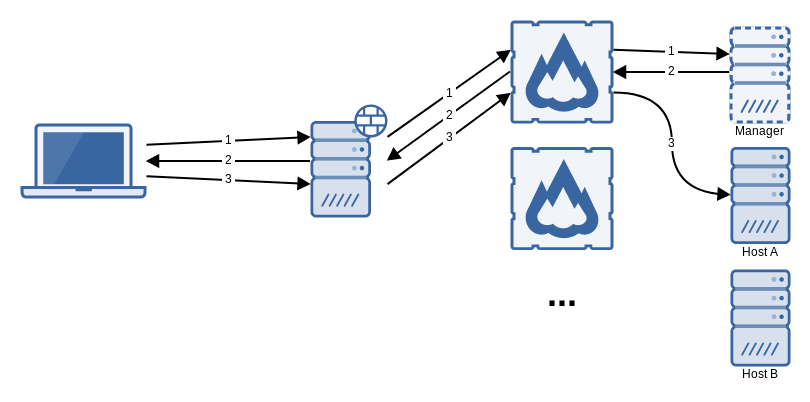
This is the protocol that flexVDI clients and managers follow to establish a VDI connection:
- The client contacts the manager, identifies itself as a terminal and, optionally, authenticates the user.
- The manager decides which desktop to assign to the user, and returns the connection parameters to the client; in particular, the address of the host where the desktop is running and the Spice port.
- The client connects to the desktop at the supplied host with the Spice protocol.
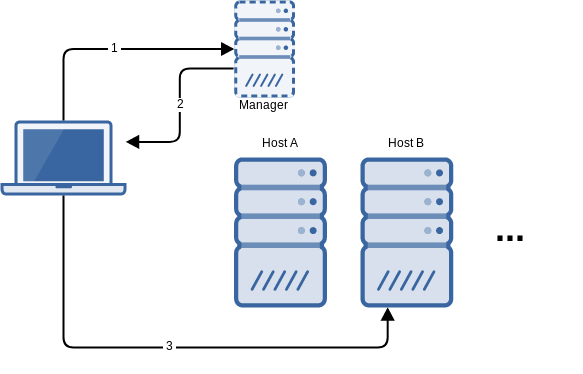
As a result of this conversation, the client must be able to contact the manager as well as every potential host where the desktop may be running. This basic configuration may be suitable when clients are connecting from an internal network.
Scenario with public and private addresses
A variation of this scenario is the one where the hosts and the manager have both a public and a private address. Clients connecting from the internal network would use the private addresses, and clients connecting from the outside would use the public ones. In order for this to work, you need a DNS server that is able to resolve either the public or the private address when the DNS query is performed from outside or inside the corporate network, respectively. Then, in the flexVDI Dashboard, modify the hosts' VDI address so that it points to their DNS name instead of their private address (which is the value by default):
- In the Guest/Host/Pool section, right-click on a host and select the "Modify" action. The following form will appear:
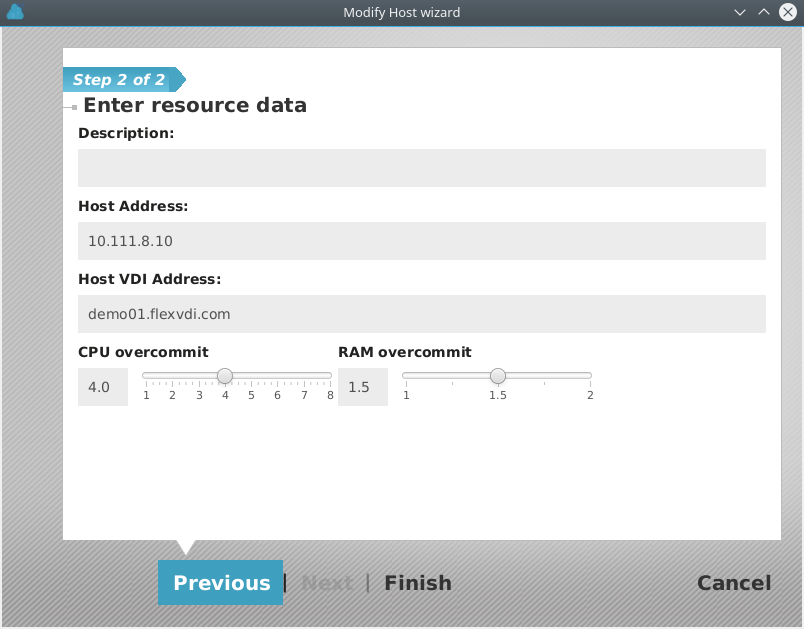
- In the "Host VDI Address" field, write the DNS name of the host.
In this way, the DNS name will be used when the manager returns the address of the host where a desktop is running. The client will correctly resolve the IP address of the host, depending on where it is connecting from.
Meet the flexVDI Gateway
The two previous scenarios have several drawbacks:
- The manager and the hosts must be publicly exposed, so that clients can contact it.
- The connection is not encrypted.
- The connection to the manager is performed on TCP port 443, but the connection to the desktop with the Spice protocol is performed on any TCP port starting at 5900 (up to a configurable limit), which is different for each desktop. So, firewall rules become complex.
The flexVDI Gateway is a software component that overcomes this limitations by encapsulating all the traffic, either to the manager or the desktop, with WebSockets over TLS encryption at port 443:
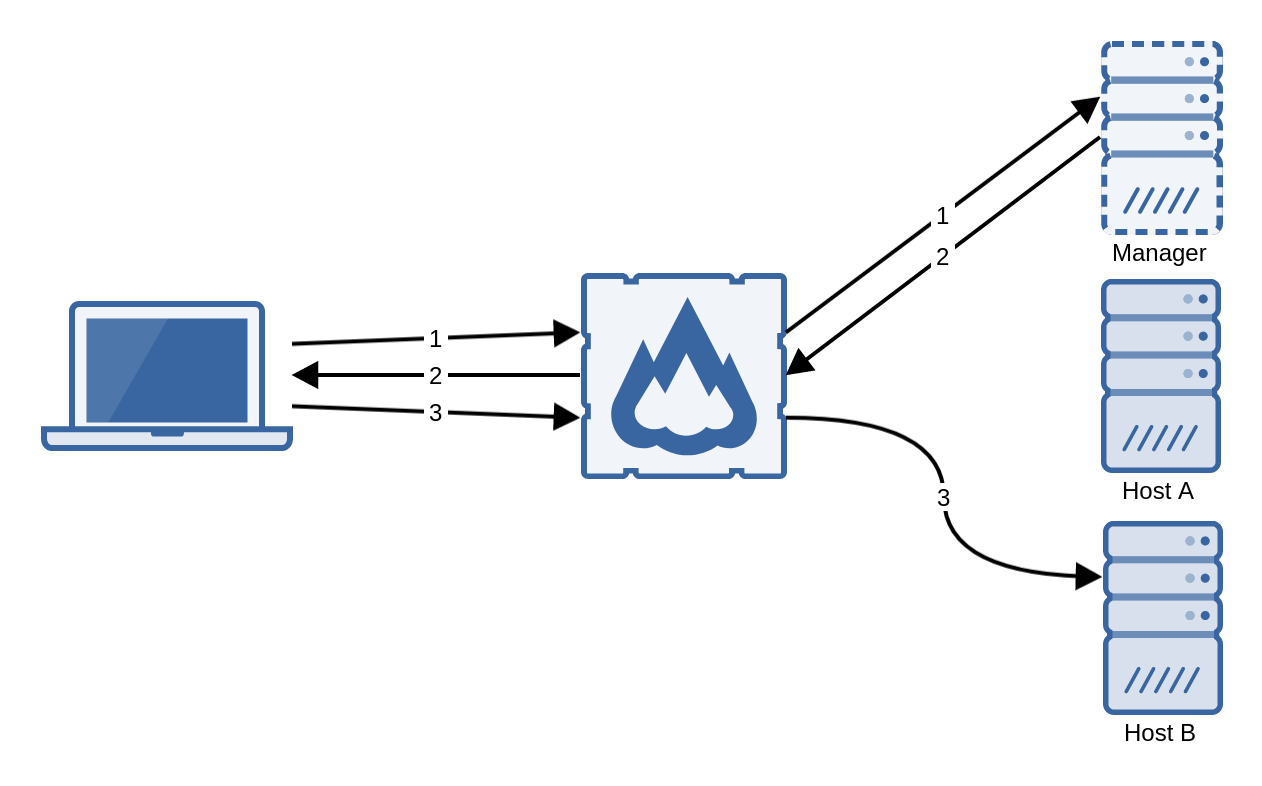
In this way, only TCP port 443 (or the port you configure) of the machine that runs the gateway must be exposed to the clients.
Installation and configuration
The flexVDI Gateway is available as an RPM package for CentOS 7 and RHEL 7, and can be installed from the flexVDI 3.0 Repository. In fact, it is automatically installed and enabled by default on every flexVDI host.
Its configuration file, /etc/flexvdi/flexvdi-gateway.conf, must contain a valid JSON object. These are the most common configuration properties (and their default values):
{
    "ManagerIP": "",
    "SslPort": 443,
    "FirstSpicePort": 5900,
    "LastSpicePort": 25900,
    "CertFile": "/etc/ssl/certs/flexvdi-agent",
    "KeyFile": "/etc/ssl/certs/flexvdi-agent",
    "HijackAll": true,
    "KeepAlive": 0,
    "Debug": false
}
- ManagerIP: It must contain the IP address or name of the manager.
- SslPort: The port where the gateway listens for connections from clients.
- FirstSpicePort: The start port of the range of valid desktop ports. The gateway will refuse to make a connection to a host's TCP port that is not in this range.
- LastSpicePort: The end port of the range.
- CertFile: SSL certificate to identify the gateway in the TLS connection, in PEM format.
- KeyFile: SSL key of the SSL certificate. It can be the same file as the certificate, containing both.
- HijackAll: Use the same gateway for all the hosts or one gateway for each host. More on this in the next section.
- KeepAlive: If it is different than zero, send a WebSocket Ping message every n seconds to keep the connection up. This will prevent other network elements (like web proxies, firewalls, etc.) from closing idle connections.
- Debug: Show additional debug information in syslog.
Usually, you should only need to set the manager's address and whether to use one gateway for each host or not. Other default values are just right most of the time. You should not need to modify the range of valid Spice ports, as they match with the default range of ports the manager generates when a new desktop is created. Also, the flexvdi-gateway will use the same certificate as the host agent by default (which is an auto-generated, self-signed certificate, again, by default). Once you modify the configuration file, restart the service with:
# systemctl restart flexvdi-gateway
Hijacking connections
The flexVDI Gateway acts as a proxy between the client, on one side, and the manager and the host, on the other side. When the gateway relays the manager's response with the host's address, it can act in two ways:
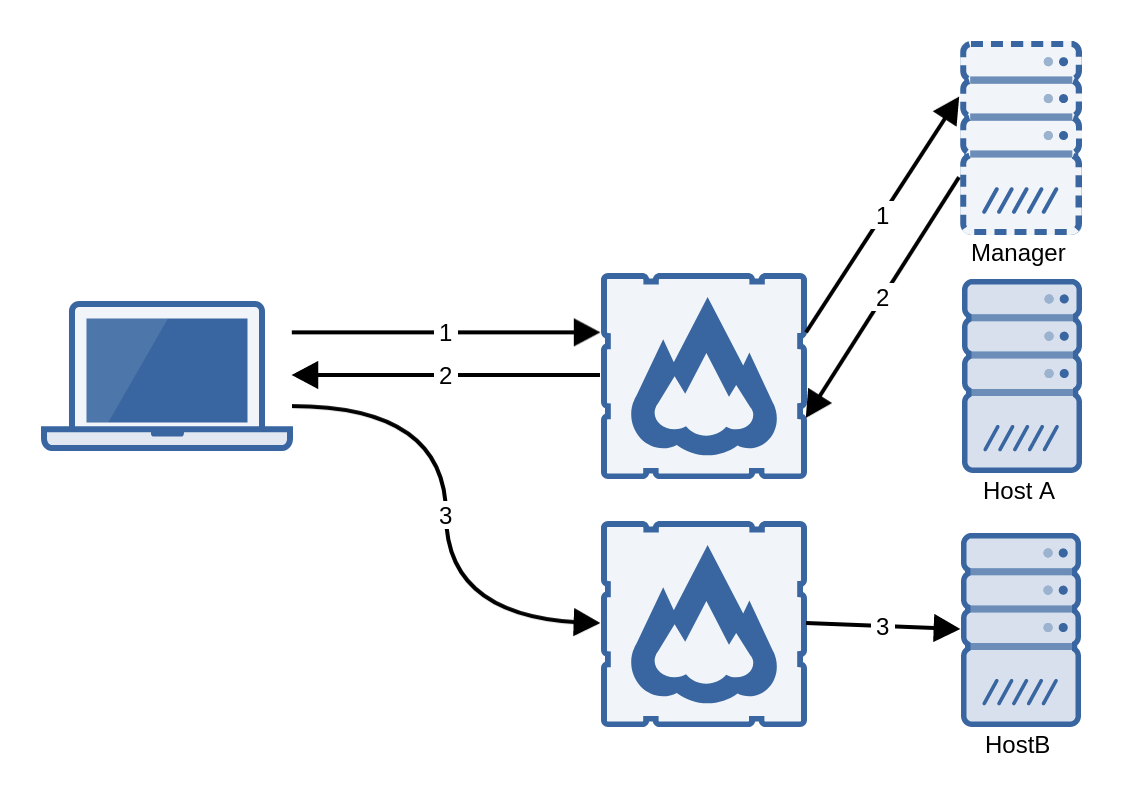
- Return the response as is (HijackAll = false). In this case, the client can initiate the connection with the gateway at any host, and then it will be redirected to the gateway at the host that is running the desktop.
- "Hijack" the connection by replacing the host's address in the response by its own (HijackAll = true). In this case, the client will not be redirected, using always the same gateway where it initiated the connection.
This behavior makes possible the following common scenarios:
- One gateway in each host, no hijacking. The client initiates the connection to any of them, then it is redirected to the host that runs its desktop. In this configuration, the client must be able to reach all the hosts, either directly or with a public address behind a firewall, as explained in the simple configuration.
- One gateway in each host, no hijacking, balanced initial connection. This is the same scenario as the last one, but with a web balancer in front of the gateways for the initial connections. The clients are then pointed to the web balancer, and redirected later to the respective gateway.
- One gateway for all the platform, hijacking all connections. The clients are pointed to this gateway and they need not know any other host of the platform. The gateway does not need to be in any of the hosts, either, it can be deployed in a different server.
- A balanced pool of gateways, hijacking all connections. The clients are pointed towards the web balancer, which assigns them a gateway that routes all their connections. In order for this scenario to work, sequential connections of the same client must be assigned to the same gateway. This can be done, for instance, assigning by source address.
Connecting through a reverse HTTPS proxy
Since the connection between the clients and the gateway are tunneled through HTTPS with WebSockets, they can be managed by a reverse HTTPS proxy. However, the proxy must be configured to open a WebSocket connection with the Gateway. For instance, an Nginx reverse proxy should be configured with the following rule:
location = / {
  proxy_pass http://your_gateway;
  proxy_http_version 1.1;
  proxy_set_header Upgrade $http_upgrade;
  proxy_set_header Connection "upgrade";
}
For Apache, you need at least Apache 2.4 and the mod_proxy_wstunnel module.